Category Archives: Uncategorized

The Hyperconverged Homelab—Windows VM Gaming

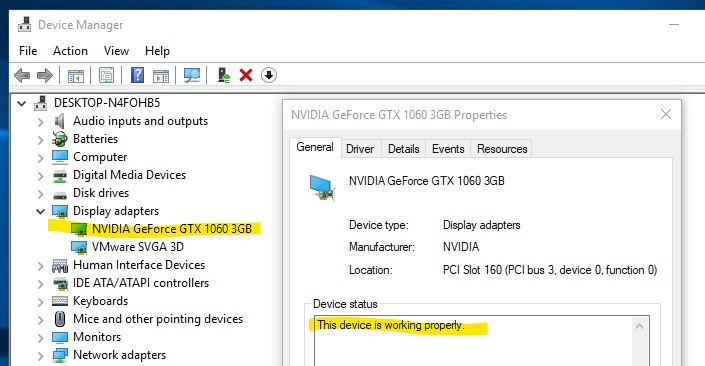
Shows "NVIDIA GeForce GTX 1060" in the Windows 10 Device Manager alongside the "VMWare SVGA 3D" display device.
An NVIDIA GeForce GTX 1060 3GB successfully passed through to a Windows 10 VM under ESXi 6.7.

With the last couple of major revision to VMWare’s enterprise virtualization platform, ESXi, it has become relatively easy to robustly pass through consumer NVIDIA GPUs for use in virtualized gaming and other consumer/enthusiast configurations. However, although information on how to correctly configure this may be widely available, it’s usually poorly explained. After successfully configuring NVIDIA passthrough and driver support on a Windows 10 client, here’s my rundown of the requirements, process, and potential issues.

What You Need

  • A virtualization server with an available PCIe slot.
  • An NVIDIA consumer graphics card. This should work on any card that’s still supported by NVIDIA’s drivers, without requiring the use of a specific driver version or unsigned driver hack.
  • ESXi 6.5 or later.
  • A Windows 10 VM. If you don’t have one, I’ll be covering cheap legitimate Windows 10 licenses in a future post.

How to Proceed

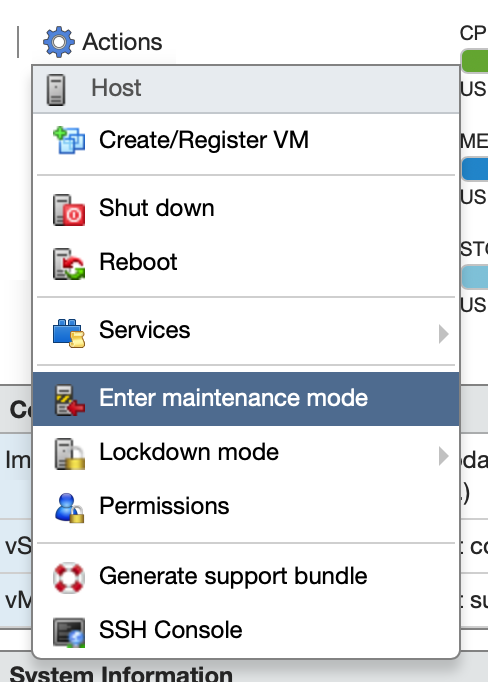
Put the ESXi host into Maintenance Mode, shut down the server, and install the GPU. We’ll have to reboot the ESXi host fully at least once, so set Maintenance Mode to prevent any VMs from automatically booting.

Reboot the server and configure the BIOS. If you’re using a server motherboard, you probably don’t have to change anything. However, those using a consumer desktop motherboard may need to change their default display device settings if they’ve been using the onboard graphics of their CPU. Note the following requirements: Intel Virtualization Technology (vT-d) must be enabled to support PCIe device passthrough, the GPU must be enabled as the primary display device, and a display may need to be connected during boot. If you’ve made any changes, save and reboot the server. Caveats: I have not yet been successful at simultaneously passing through both the integrated graphics on my Intel CPU and any external GPU. I believe that this is an issue with my consumer motherboard BIOS only allowing one of the graphics devices to be enabled at a time, but I don’t have a second PCIe GPU to test this theory with. I have confirmed passthrough of the Skylake onboard Intel HD Graphics 530.

Configure PCIe device passthrough. Now that you’ve fully booted the server, open up the ESXi web client. Select Host→Manage→Hardware→PCI Devices. You should see your GPU in the device list. As such:

If not, shut down the server and ensure that the card is fully seated and that you’ve correctly configured your BIOS. Select the GPU in the Devices list and click “Toggle Passthrough”. For NVIDIA GTX series with HDMI audio, you’ll also see an onboard high definition audio device, which may also be selected when you select the GPU itself. These should be treated as a single device, always passed through to the same VM. Ensure that you enable passthrough on both.

Reboot the server. A reboot is necessary to enable PCI Device passthrough. If you’re using a consumer motherboard with the GPU selected as your primary display, you will lose access to the hardware console part-way through the boot process. This will occur at “dma_mapper_iommu loaded successfully”, which is the PCI device passthrough module. When ESXi loads this module with a configuration for passthrough, it will take control of the passed-through device so that it can be made available to VMs. If the passed-through device is set as your primary display when ESXi boots, it will simply cut out the display at this point. However, ESXi will still boot (barring any other errors) and run just fine.

You can now remove the ESXi host from Maintenance Mode.

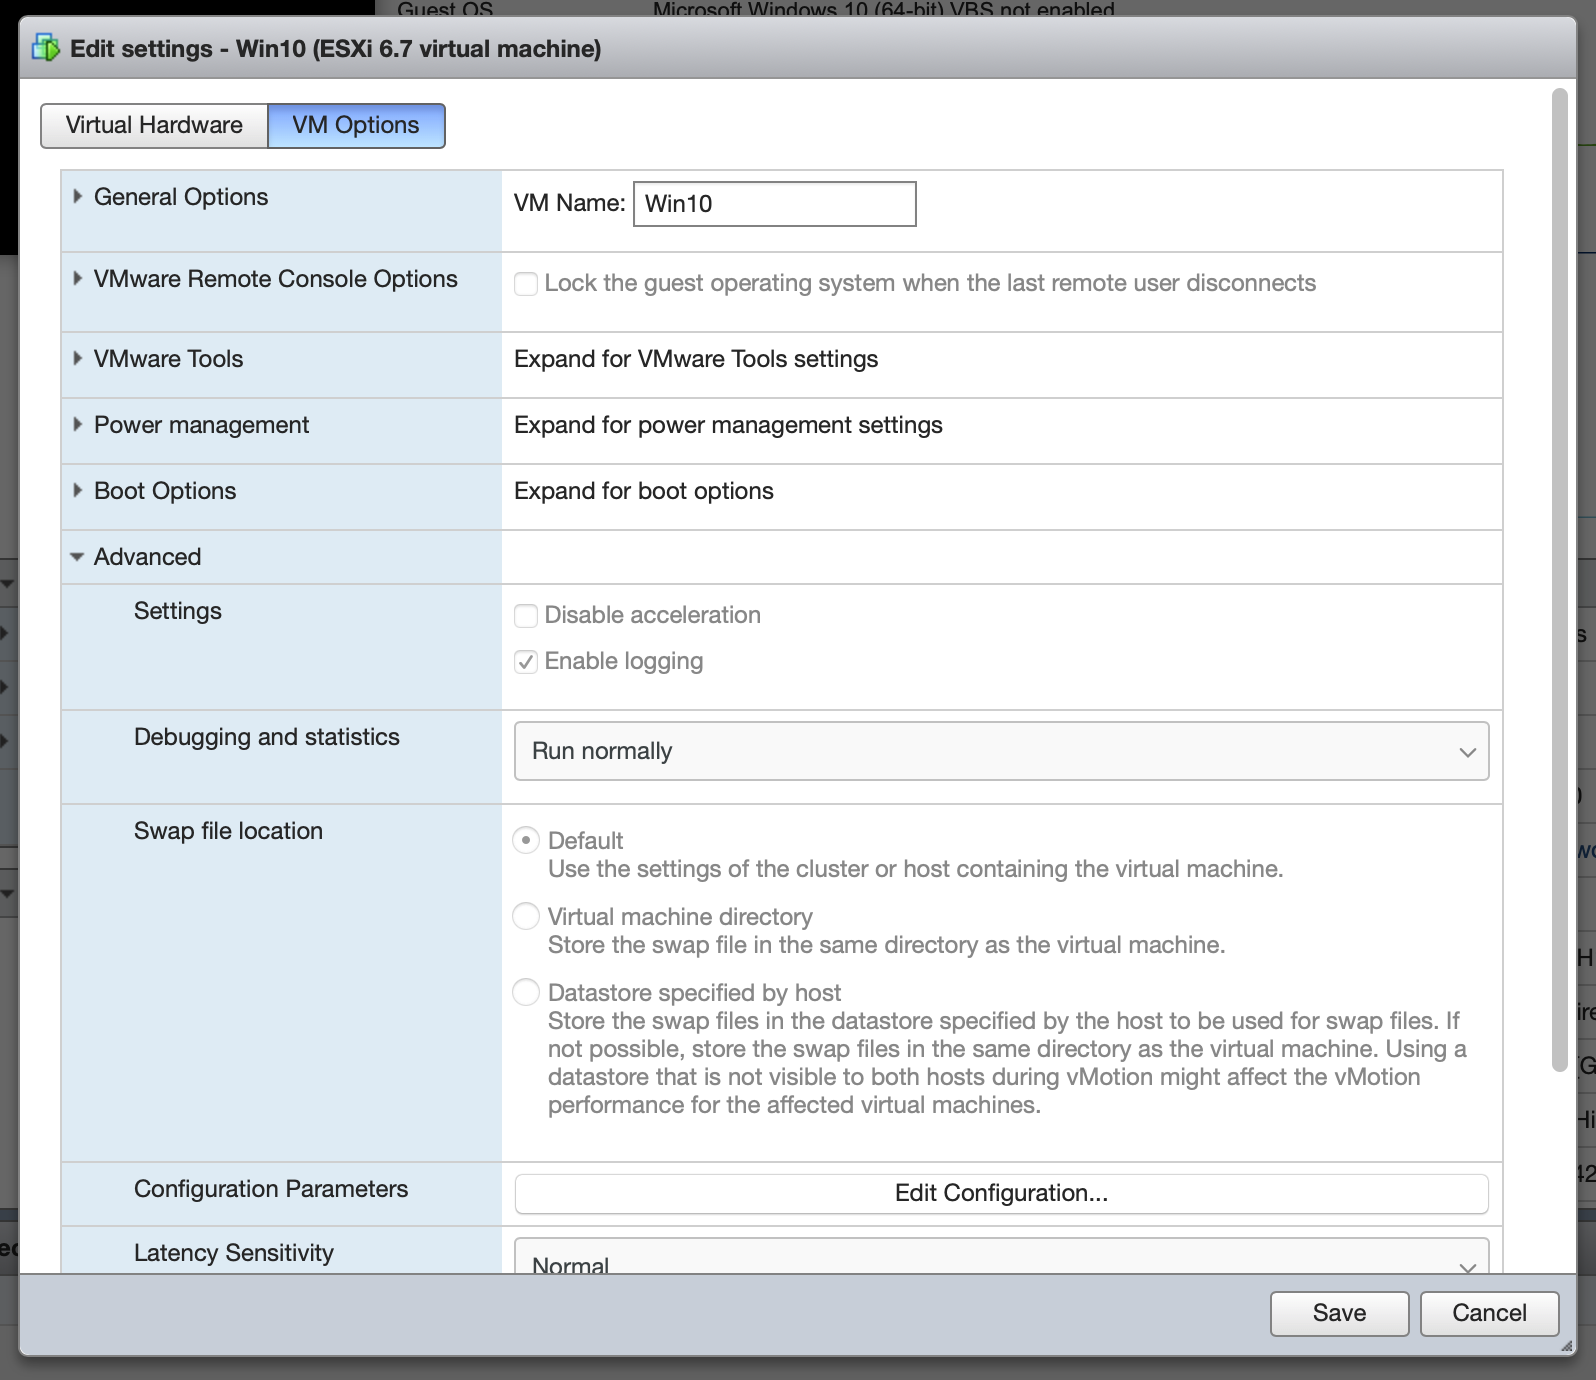
Configure PCI Device Passthrough. While it is powered down, open up the settings for your Windows 10 VM. First, add the GPU and its associated audio device under Virtual Hardware→Add other device→PCI Device. You must also allocate all of your VM’s RAM at this point, since PCIe RAM mapping doesn’t work properly with dynamically allocated RAM. Ensure that you have reserved all guest memory. It shouldn’t be necessary to lock it, but it won’t hurt. Save and close the settings window to repopulate the Advanced Settings dialog.

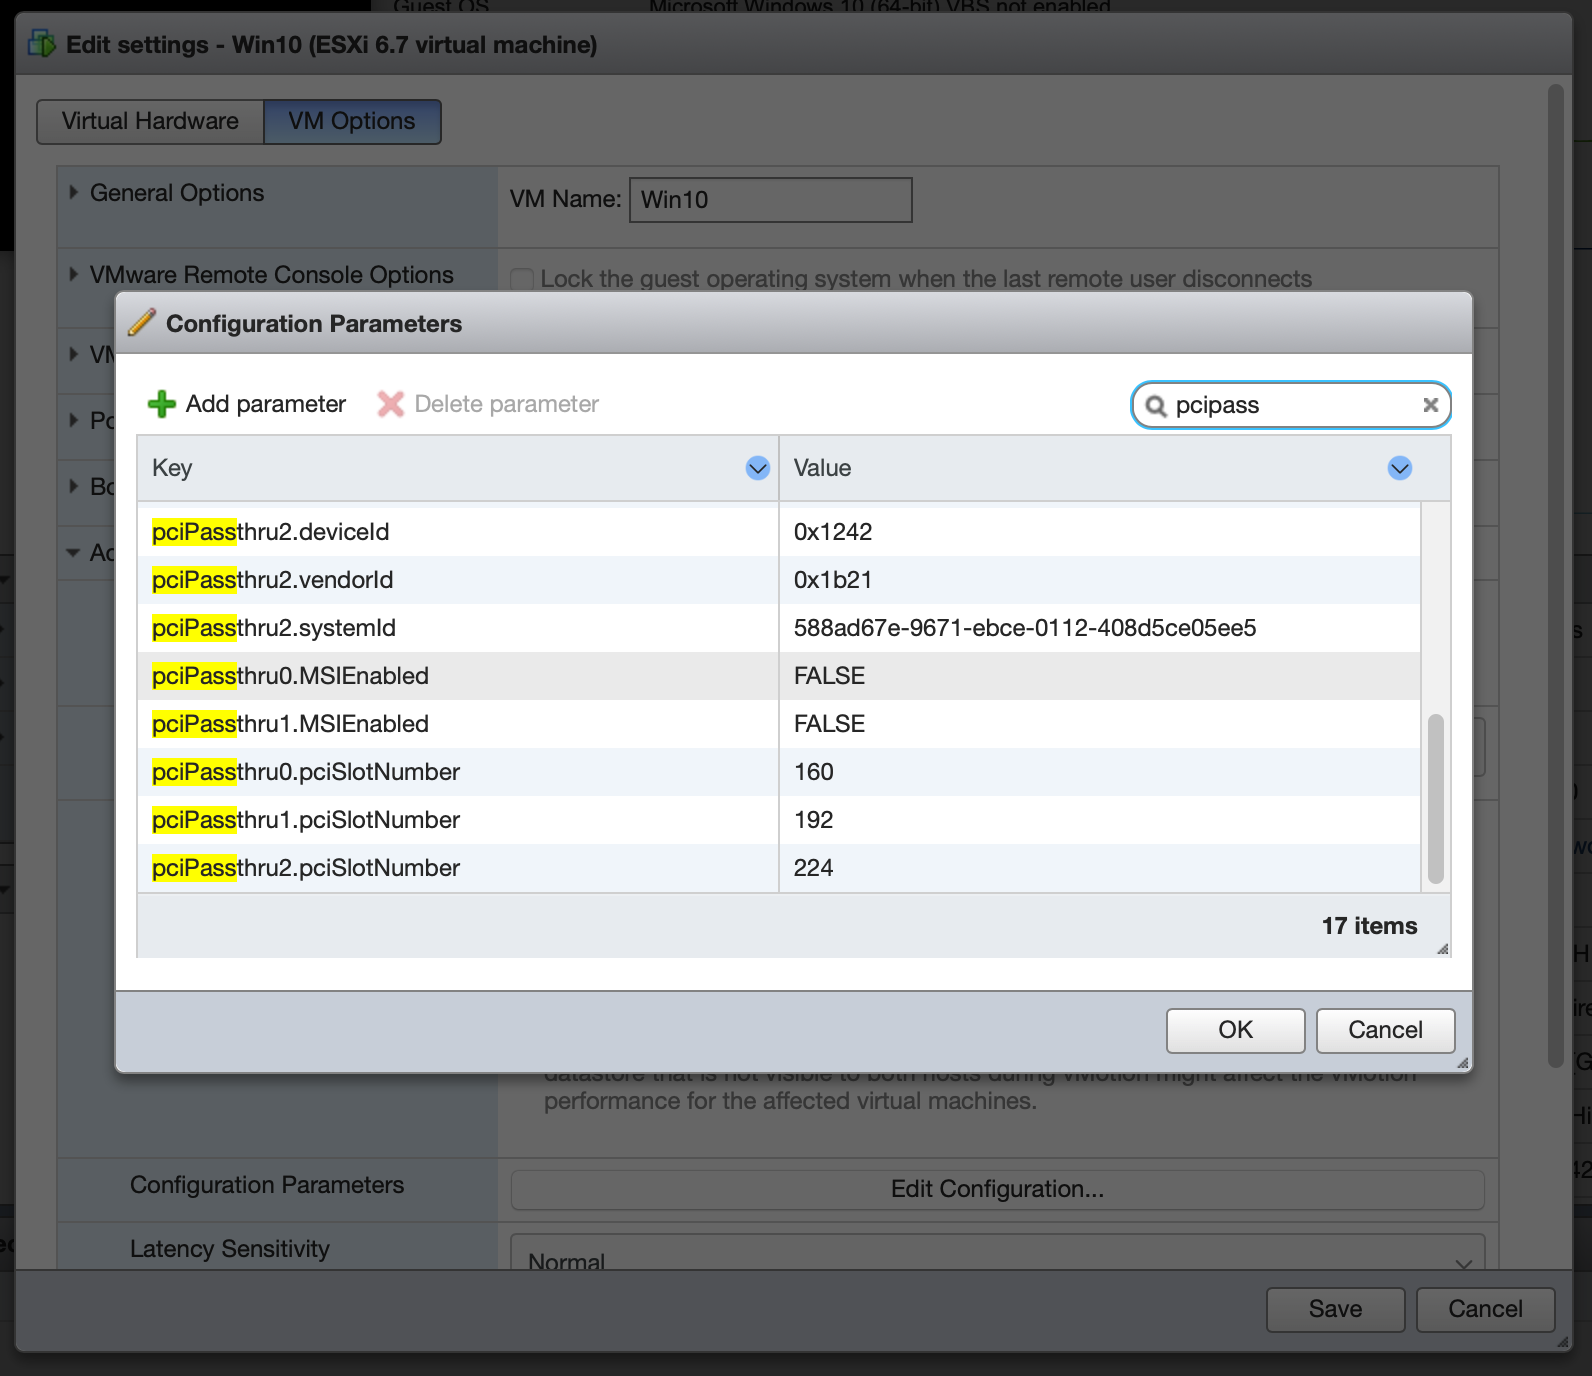
Configure Advanced Settings. Reopen the “Edit settings” dialog and select VM Options→Advanced→Edit Configuration. There are a couple flags which need to be added. For the GPU and its audio device, we have to disable Message Signaled Interrupts by setting pciPassthruX.MSIEnabled=FALSE for both devices, where X is the device passthrough number (zero-indexed, usually 0 and 1 if they’re the only PCI devices passed through to the VM). This requirement and procedure is documented by NVIDIA, who claim that it only applies to ESXi 5.0 and 5.5. However, in my configuration, this issue persists in 6.5 and 6.7, and results in lost interrupts which cause the display driver to flicker and crash, and the audio driver to stutter. This may be affected by BIOS PCI device setting for firmware mode being set to legacy (instead of EFI), but I don’t know.

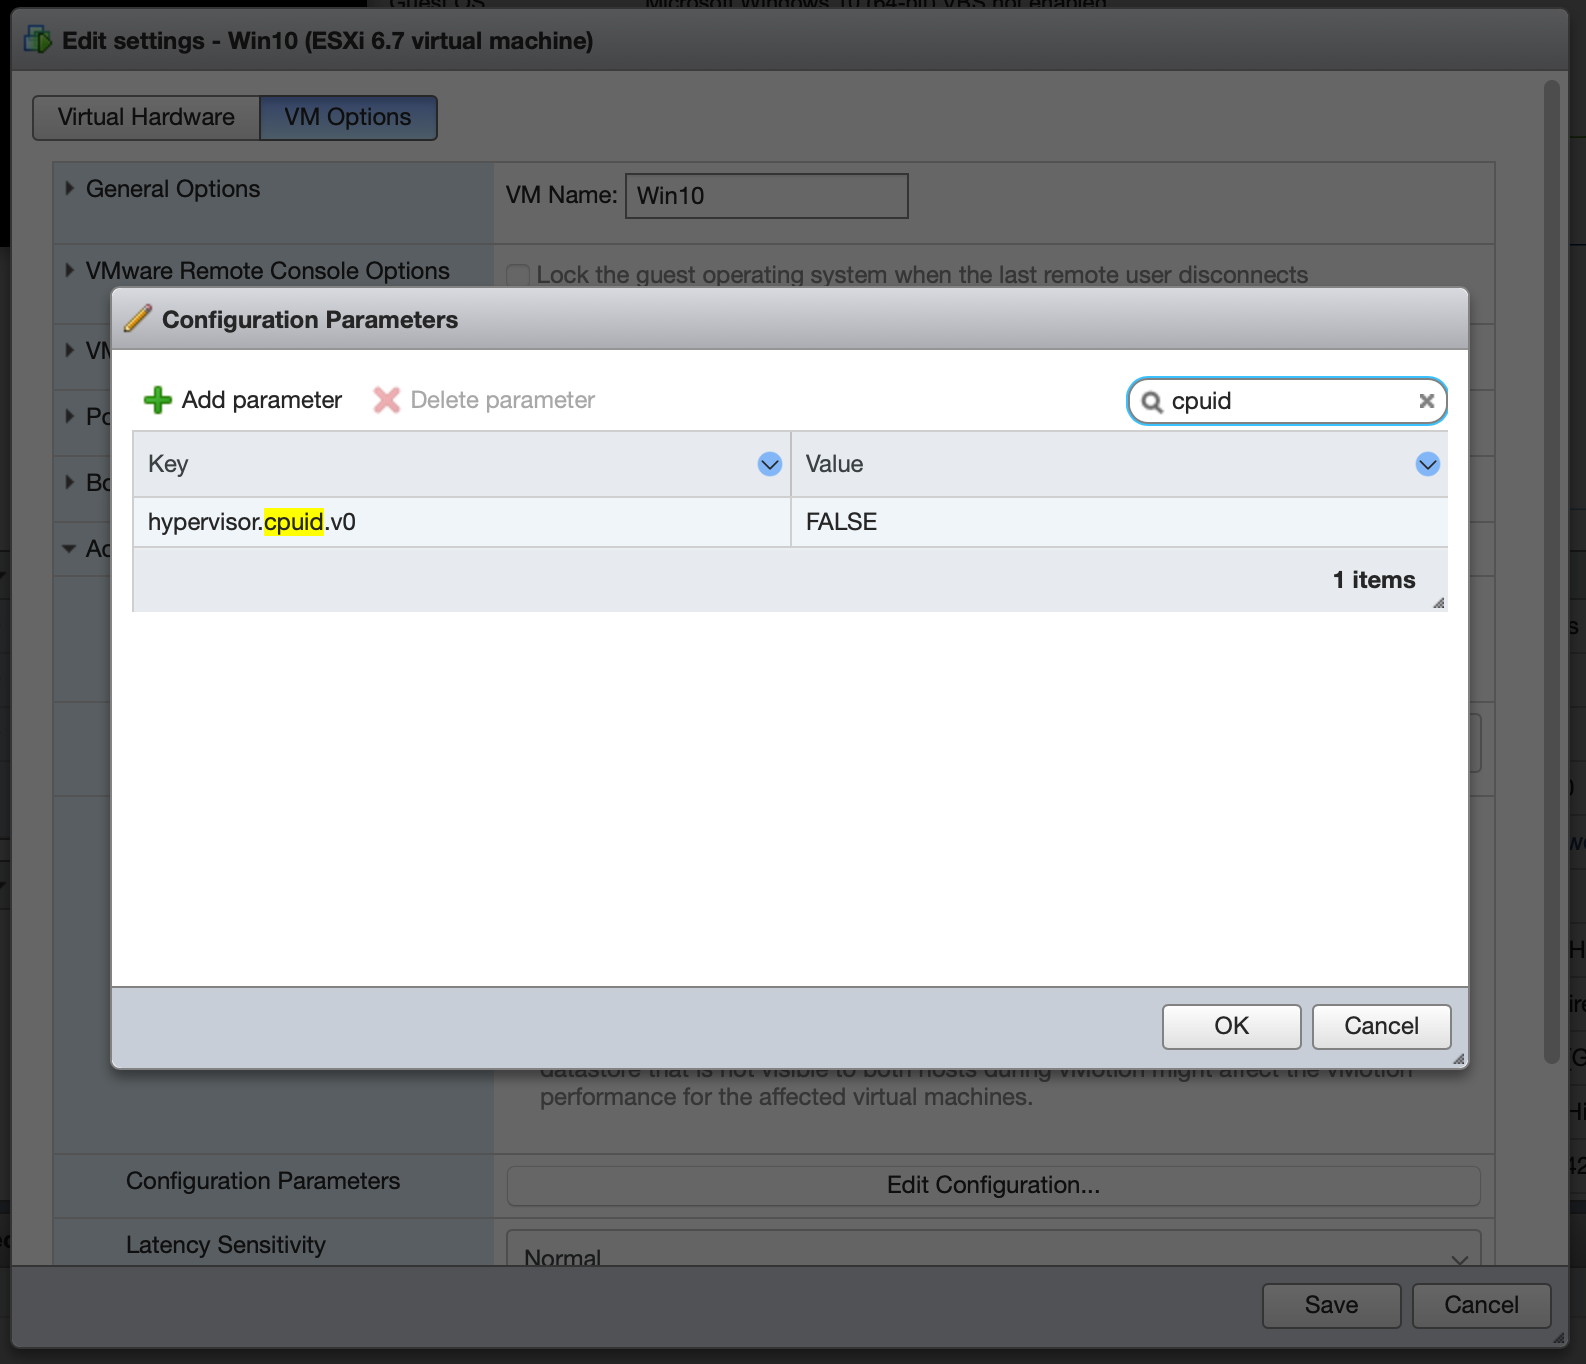
Next, configure hypervisor masking by setting hypervisor.cpuid.v0=FALSE. This prevents the VM OS from detecting that it’s being run under virtualization, which is necessary to prevent the NVIDIA driver from crashing.

Now you should be able to boot the Windows VM and simply install the official NVIDIA drivers as normal! Behold your success, the NVIDIA driver running under ESXi!

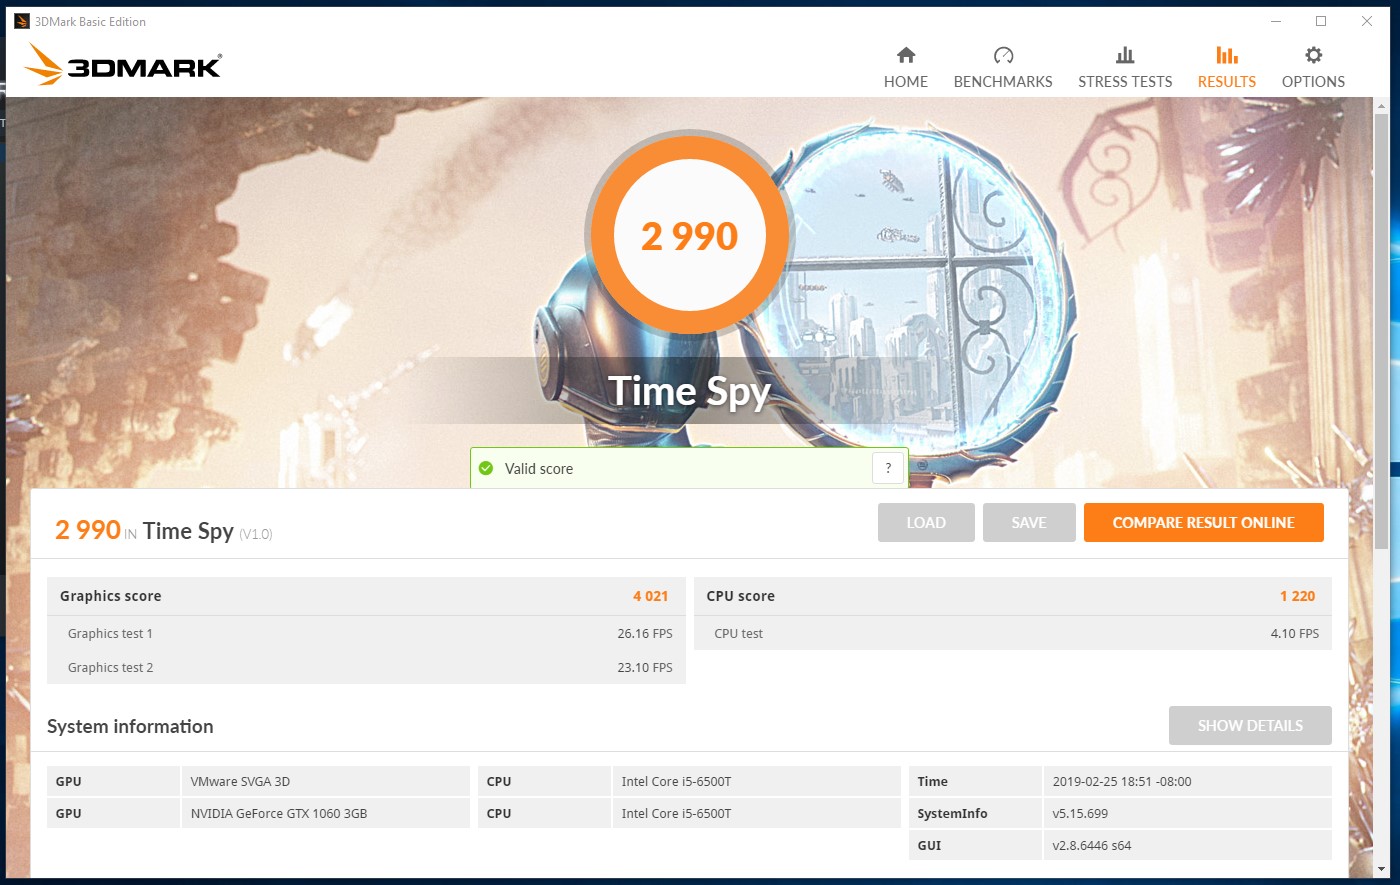
An NVIDIA GeForce GTX 1060 3GB successfully passed through to a Windows 10 VM under ESXi 6.7.

In my configuration, I am able to run 3DMark Time Spy surprisingly well, with a tolerable 25–30fps throughout most of both graphics tests at 1080p, giving a graphics score of 4021. However, performance is dramatically CPU-constrained due to the i5-6500T’s low base clock and failure to properly Turbo in my current configuration. The physics test reflects this with an appalling framerate of around 4 fps and a CPU score of 1220. Overall, leading to a score of 2990.

An overall mediocre result due to appalling CPU performance.

We’ll see if some improvement cannot be achieved with a little judicious CPU overclocking.

Update: 26 Feb 2019

After extensive fiddling with various BIOS settings, I am still unable to get ESXi to play nice with passing through both the NVIDIA GPU and the onboard Intel GPU. I have, however, recovered the ESXi boot/console display, which no longer hangs at mmio initialization after I set the PCIe device option rom execution to EFI. This behavior reverts if I set “Video option ROM” to any value other than “Legacy”. Anyways, back to GPU troubles:

I have confirmed that this is not a hardware compatibility/functionality or configuration issue by booting Ubuntu 18.10 on the server, which is able to utilize both display devices by default. There is no problem whatsoever in having both GPUs enabled in the BIOS, which are then utilized by Ubuntu. It also respects the BIOS setting for Primary Display, and which is set as primary in BIOS has no impact on functionality.

I therefore conclude that there’s an issue with ESXi when using multiple GPUs. Although both GPUs show up correctly in the hardware listing, and can be set to passthrough, the NVIDIA GPU cannot be used if the Intel GPU is enabled in the BIOS (for example, if Intel GPU is also enabled in BIOS then I get Error 43 under Windows VM with NVIDIA GPU passed-through; disable Intel GPU and the NVIDIA card works fine). I have other PCIe devices connected and passed through which don’t seem to make any difference.

However, I note something strange: when I change the Intel GPU enabled/disabled in the BIOS, one of my other PCIe cards (LSI2008 SAS HBA) gets “lost”. It still shows up in the Host hardware list, but the VM hardware configuration line is blank. I believe it may be changing PCIe address, which is odd.

Can anyone report success getting two GPUs of any variety to pass through in ESXi? Leave a comment on the Reddit thread. I don’t have another PCIe graphics card on hand to test with, and due to hardware constraints would have to run one card at only x4, which is not ideal. And people want way too much money for their crummy old graphics cards.

Next test, which I will do some other day because I am tired of power cycling my system, will be switching which PCIe slot the GPU is in, on the off chance that having it in a non-primary slot will make some difference in the PCIe device tree that makes things behave better for ESXi.

Enable Searching of SMB Shares on Freenas under macOS

One frustrating shortcoming of accessing SMB shares from macOS is the default failure of directory indexing for file searching. You simply can’t use the normal Finder “Search” field to do anything. This makes it particularly tedious to interact with large SMB shares when you don’t know exactly where the files you want are located.

The solution at the link is simple, if obscure: select the fruit object from the available VFS Objects under the Advanced configuration of the share in question. Thanks to Spiceworks user David_CSG for dropping a hint about vfs_fruit that led me to this solution.

Edit: turns out that this doesn’t actually work. The current state of enabling SMB server-side indexing under FreeBSD appears to involve running Gnome Tracker. These instructions apparently work under FreeBSD Jail with the addition of devel/dconf dependency. iXsystems development stance is currently “Nope”. I might take a look at this and see whether the installation can be pared down; with any luck it should be possible to exclude metadata indexing components with the largest dependency footprint.

FireWire Quibble

I have a personal quibble: FireWire may be a dead product, but there are a lot of legacy devices out there (mostly in the audio world). The current-generation Thunderbolt–FireWire adapter is completely inadequate for these devices, for two reasons: 1) they’re an end-of-line device, meaning they don’t daisy chain, which makes them difficult to use with devices that have few TB ports and 2) they are limited by TB power delivery maximums to only 10W, which many FireWire legacy devices easily exceed when operating on bus power. As an example, I have a not-that-old FireWire audio interface that I’d like to run off bus power from my laptop, on the go. It draws 7.5W idle, but spikes over 10W during startup (charging capacitors, I’m sure). I can’t use it with the TB bus adapter, I need either DC power (dumb) or a second adapter (since like good FW devices this has two ports for daisy chaining). The DC power port went out a while back, so now I use an Original iPod FireWire charger on the second port to deliver enough power.

It would be nice if anyone offered a powered FireWire adapter that could deliver a lot of wattage for legacy devices.

A Mac Pro Proposal

Since the Future of the Mac Pro roundtable two weeks ago, there’s been a lot of chatter in the Pro user community analyzing  the whole situation. Marco Arment has a pretty good overview of people’s reactions in which he makes a strong case for the value of the Mac Pro as a top-of-the-lineup catchall for user needs that just can’t be met by any other Apple hardware offering. In general, Pro users seem fairly optimistic. This is a rare case of Apple engaging with its most vocal users outside of the formal product release and support cycle, and people seem to recognize its value.

However, although many commenters have variously strong opinions about their own needs (and speaking from experience is critical to help Apple understand the diverse use cases of people who buy Mac Pros), there hasn’t been a lot published on how exactly Apple could address these user needs in real products. Drawing on the specific and general demands of various Pro users, and pulling together syntheses breaking down what main categories of users have what needs, I have a proposal for the new Mac Pro technical features and product lineup. (And it’s not a concept design rendering; I’ll leave the industrial design up to Apple.) Fair warning: this is a moderately lengthy and technical discussion.

The most important thing to understand about Pro users is, as Marco Arment explains, their diversity. Pro users need more than any other device in the consumer Mac lineup can offer, but what exactly they need more of varies greatly. Since it’s such a good breakdown, I’ll quote him:

  • Video creators need as many CPU cores as possible, one or two very fast GPUs with support for cutting-edge video output resolutions (like 8K today), PCIe capture, massive amounts of storage, and the most external peripheral bandwidth possible.
  • Audio creators need fast single-core CPU performance, low-latency PCIe/Thunderbolt interfaces, rock-solid USB buses, ECC RAM for stability, and reliable silence regardless of load. (Many also use the optical audio inputs and outputs, and would appreciate the return of the line-in jack.)
  • Photographers need tons of CPU cores, tons of storage, a lot of RAM, and the biggest and best single displays.
  • Software developers, which Federighi called out in the briefing this month as possibly the largest part of Apple’s “pro” audience, need tons of CPU cores, the fastest storage possible, tons of RAM, tons of USB ports, and multiple big displays, but hardly any GPU power — unless they’re developing games or VR, in which case, they need the most GPU power possible.
  • Mac gamers need a high-speed/low-core-count CPU, the best single gaming GPU possible, and VR hardware support.
  • Budget-conscious PC builders need as many PC-standard components and interfaces as possible to maximize potential for upgrades, repairs, and expansion down the road.
  • And more, and more

I translated this to a table, for clarity. First, a caveat: “software developers” refers to general consumer software. Software developers who work in the other listed fields have all of the same requirements as that field in addition to the general requirements: a game developer needs a good gaming GPU, a video tools developer needs lots of cores and dual GPUs, etc.:

Pro Type CPU GPU RAM Expansion
Video High Core Count Dual GPU Max Lots
Audio Fast Single Core Low Max ECC Some
Photography High Core Count Low Lots Little
Software High Core Count Low Lots None
Games Fast Single Core Fast Single GPU Lots None

This is a lot clearer, and we can see some trends. For CPU requirements, Pros generally either need fast single core performance or good multi-core performance. For GPU requirements, Pros generally either need fast single GPU performance or good dual-GPU performance. Everyone needs a lot of RAM; some need ECC RAM. Some need a lot of expansion, and others need none.

The best divider for Pro users appears to be around CPU: either fast single core CPU or high core count CPU needs. GPU needs are more variable, pretty much everyone needs a lot of RAM, and a few users need chassis expandability. The most demanding overall users are video editors, who need not only lots of CPU cores, dual GPUs, and huge amounts of RAM (128GB, if not more), but also demand a lot of internal hardware expansion for video interface/capture cards, audio interface/capture cards, and data communication cards (fiber channel). I say “internal expansion” because the reality for these users is that 1) their hardware is niche, expensive, and slow-moving thus requiring PCIe form factor support; 2) Thunderbolt 3 and other protocol adoption is slow in the industry and not available natively or just not workable in external enclosures for many applications; and 3) having stacks of external devices and enclosures, on top of other specialized hardware, is unwieldy, expensive, and ugly.

There are some other requirements that most Pro commenters noted as well:

  • Thunderbolt 3 is great, but not everyone needs as many ports. A couple folks have noted a desire for 8 Thunderbolt 3 ports at full speed, but this takes up valuable bus bandwidth and eats into PCIe capacity, so 4x might be offered as well.
  • Even accepting Thunderbolt as the future, and having a bunch of USB-C/Thunderbolt 3 full compatibility ports, there are still many USB-A devices in the world. Some of these are legacy hardware that doesn’t play nice with USB adapters and hubs. So a couple USB-A legacy ports would be nice. Speaking of USB-C, all provided Thunderbolt ports should support full Thunderbolt 3/USB-C functionality.
  • Whisper quiet operation is assumed. Besides audio applications where it is a necessity, nobody likes having a jet take off near their workspace. The fastest single GPU applications can accept a little fan noise, but it should be limited as much as possible. Whether this takes the form of more clever thermal management or liquid cooling makes no difference as long as it doesn’t restrict the thermal footprint of the device. Thermal capacity restriction is one of the primary failings of the 2013 design, identified by Pro users, engineers, and recognized by Apple itself.
  • Nobody cares about having an optical drive (the 2013 design had this right), but if there is one it damn well better be an industry standard component and support Blu-Ray without janky third-party stuff. The inclusion of really excellent DVD decoding and playing software in the Mac was a big deal, and the lack of this software for Blu-Ray is making the format a massive PITA for professionals and consumers alike. Physical media may be dying, but it’s not dead yet. A nice solution here would be a refresh to the SuperDrive: update it to TB-3/USB-C and make it read and write BluRay (or make two: one that reads and writes CD/DVD and one that reads and writes Blu-Ray in addition).
  • Likewise, space for 3.5″ spinning platter hard drives is not important. The 2013 design made the right call on this: they’re too slow for Pro use, and there’s no need to have large/archival storage capacity within the device as long as there’s enough SSD scratch space for active projects.
  • The audio output combo jack (optical + 3.5mm TRS) is brilliant and convenient. However, many users valued the dedicated audio input jack and would like it back. Make it also a combo jack with optical and 3.5mm TRS, and support line and mic level input. This doesn’t have to be a balanced XLR connector with phantom power, just a mic/line/optical combo jack.
  • Finally, and perhaps most critically: all BTO components should be industry standard and third-party compatible. This means processor(s), GPU(s), RAM, SSDs, and standard PCIe cards. Being stuck with whatever BTO configuration they initially order is a huge, deal-breaking inconvenience for many self-employed Pro users. It’s insulting to their knowledge of their own unique product needs and comes off as absurdly greedy. Not only is the Mac market a small fraction of Apple’s revenue, the top end Pro segment is absolutely miniscule. Nickel-and-diming Pro users by charging exorbitant rates for high end BTO configurations, Apple-certified-exclusive hardware upgrades, and incompatible parts lock-in is nothing less than stupid and comes off as incredibly arrogant. Pros are willing to pay a premium for premium components, but not for huge markups on things they won’t even use in their industry (like audio pros saddled with useless dual GPUs).
  • Besides the consumer-facing arguments for using standard components, there’s also a strong technical argument to be made: a big part of the 2013 Mac Pro’s stagnation has been a lack of consistent updates from Apple, and the complete inability for third parties to fill this void. Using industry standard components makes it easier for Apple to offer consistent product updates to the latest industry offerings (requiring less R&D on building custom components), and for consumers to upgrade their existing devices as the technology advances. This is to everyone’s benefit.

Finally, I’m not here to design enclosures, only to outline purely technical requirements. How Apple chooses to package any such device(s) I am deliberately leaving open ended. I think that the 2013 Mac Pro enclosure redesign was brilliant, aesthetically and functionally. It failed not in the eyes of the Pro community because of its appearance, size, or clever design, but in their workflows and environments because it did not meet their diverse technical needs. Any new device does not have to be a return to the iconic “cheese grater” tower, but it needs to address the technical needs that I identified above.

Perhaps most of all, it needs to make products like Sonnet’s xMac Pro Server enclosure unnecessary for non-enterprise users. While such a product fine for the datacenter and for server applications (I’m not going to go into the demand for proper Mac server hardware here), the fact that a $1,500 enclosure is the most convenient way to get back functionality that came standard in the previous generation device is obscene. I’m referring, of course, to user upgradeable (and expandable) storage and PCIe card support. Even for that much it is inadequate for GPUs, since it only offers PCIe 2.0 slots. A rack form factor is not appropriate for a significant segment of Pro users, and requiring any unwieldy external enclosure for hardware expansion is ridiculous to the point of obscenity in the face of the entire rest of the desktop computer hardware market.

With these considerations in mind, I’ve come up with a model lineup that I believe provides the best balance between flexibility/capacity and reasonable excess: meeting the highly variable needs of the Pro market segment without making everyone buy the same super-in-every-way machine. I propose two motherboard-distinct configurations, which may or may not ship in the same enclosure; I don’t care, and it doesn’t matter to Pro users as long as their technical needs are met. Without further ado:

Configuration 1: Emphasis on Audio, Games, & Software

  • Single socket latest generation Intel processor. Configurable 4 to 8 cores.
  • 4x DDR4 ECC RAM slots. Configurable 16GB up to 512GB. Make the base configuration 1x16GB so users don’t have to toss their factory RAM to upgrade a little.
  • 2x PCIe 3.0 x16 dual-width standard slots. Configurable with choice of graphics card(s) (None, Single, Dual). Maybe one or two x8 slots as well.
  • 4x Thunderbolt 3/USB-C ports.

Configuration 2: Emphasis on Video, Photography, & Software

  • Dual socket latest generation Intel processors. Configurable with one or two sockets used, 4 (single socket) to 16 cores (dual socket).
  • 8x DDR4 ECC RAM slots. Configurable 16GB up to 1024GB. 1x16GB min. configuration, again.
  • 4x PCIe 3.0 x16 dual width standard slots. Configurable with choice of graphics card(s) (None, Single, Dual). Maybe two or four x8 slots as well.
  • 8x Thunderbolt 3/USB-C ports.

Offering two distinct motherboards with two distinct levels of capability provides the kind of configuration flexibility that has been identified as crucial for the Pro device market. Audio editors aren’t locked into a dual-socket, dual-GPU device that they won’t be able to take advantage of; video editors can get the dual GPU capabilities they need; and VR and Games developers can get high temperature single GPUs that are typical in their industries.

However, this is where the distinctions end. Offering too many differences between models is both too much R&D work, and also a recipe for crowding users into a configuration that will have either more of what they don’t need or less of what they do. I therefore propose that the devices be feature equivalent in the following ways:

  • Dual 10G-BaseT Ethernet. Enough professionals work in data-heavy environments that bandwidth for storage interfaces is a big issue. Dual-bonded 10Gb offers 20 gigabit throughput for a lot less cost than fiber channel, and offering it built in frees up a PCIe slot for Pros who would otherwise use fiber channel (or bonded 10GbE). Even at single 10Gb there are workflows in video, audio, and photo editing which are not possible with 1Gb. Users are becoming familiar with the speed experience of SSDs, and Pros need that speed in their networking too. Heck, USB 3.1 is 10Gb signaling. Many will only ever use one port, but providing two is the right choice.
  • Bluetooth 4.2/4.1/BLE/4.0/3.0/2.1+EDR and 802.11ac WiFi. No comment.
  • 4x M.2 PCIe NVMe SSD slots. Of course the slots could be used for other things, but the primary purpose is to access industry-standard SSDs, which the user can upgrade and expand. Although enterprise can stand shelling out big bucks for Apple SSDs BTO, nobody can stand having them soldered to the board or otherwise proprietary. Four slots should be sufficient; Pros with bigger data needs than that often have or would benefit from external RAID and NAS (especially with those 10GbE ports spec’d above). The working storage within a Pro device should be the fastest available, and of sufficient working capacity to allow video, audio, and other asset-heavy Pros to use the fastest local data storage for their project workspace. Larger capacity data storage (>4TB) is a niche market, and a strong argument can be made that these users’ needs for archival and reference storage are better met with outboard solutions, which are becoming financially and technically accessible. This is one of the driving justifications for including Dual 10GbE, to allow the fastest access to economical network-attached storage. These slots need to support RAID for drive redundancy and speed, including on boot drives. Folks also mention the value of having them for Time Machine. 8TB total capacity has been mentioned, and seems like a reasonable (if still quite expensive) upper bound. So the idea is that you get fast boot for the OS and a good chunk of fast scratch space if you’re working with large assets. Being able to have a complete local copy of large Premiere projects (or at least sufficiently large chunks of them) is, I’ve heard, invaluable.
  • 2x HDMI 2.1. HDMI 2.1 is shaping up as the future of high resolution display connection, and having HDMI for compatibility is necessary anyways. Of course support multichannel audio out via HDMI. I also understand that an Apple branded display is returning. Many Pros benefit from having dual displays, and offering an Apple branded display with HDMI connectivity would expand the market for such a device outside of the Mac sphere, and would also free up TB3 ports for other bandwidth-intensive peripherals. Apple displays are recognized among video and photography Pros as some of the best in the market, and are still widely used even by non-Mac users. It seems reasonable to offer them in both unadorned base HDMI configuration and slightly more expensive TB3 (with backside USB/hub) versions.
  • 2x USB-A 3.1. Put one of them somewhere easily accessible (for USB flash drives and convenience peripherals). Put one on the back for legacy devices for the handful of users who need them. USB-C/Thunderbolt 3 is the future of peripherals; Pros understand this, and adapters from USB-C to USB-A are cheap and not too inconvenient, so there’s no need to weigh down the device with USB-A legacy ports.
  • Dedicated Audio In/Audio Out optical/analog combo jacks, with line/mic support. Many people have lamented the loss of the dedicated line in jack. Making it an optical and line/mic combo would be fantastic. For day-to-day use, put a headset combo jack on the front panel/same as the USB-A legacy port: plugging headphones into the back of a device sucks, as does plugging in a USB flash drive.
  • SD card combo reader. This is a convenience feature for photography and videography professionals. It’s a concession to their trade, and should be placed conveniently on the front of the device if included. However, I understand if it’s not included.
  • RAM should be ECC. This is the Pro market, and enough folks would benefit to make it standard.
  • Also, RAM should be DDR4. There’s a few percent latency penalty, but the significant energy (aka heat) savings, access to higher capacity DIMMs, and modern processor support make it time for the switch. Although theoretically possible, there is no DDR3 module on the market sporting >16 GiB capacity, and in fact no consumer motherboard ever manufactured that could utilize such a module. There are, however, as much as 128GB DDR4 DIMMs on the market right now. They cost an arm and a leg, but they exist. Producing computers capable of utilizing these modules would increase demand, this increase their availability and decrease price.
  • PCIe card slots should support all industry standard devices, including GPUs. The devices’ provided GPUs should also use these slots. No weird form factors, inaccessible mounting locations, or failure to support double wide cards. The number of slots a user anticipates needing shall inform their choice of build; since GPU needs are so highly variable it is reasonable to offer variety.

This provides two primary configurations, which have distinct motherboards and distinct capacities. They’re similar enough to be housed in the same enclosure, or distinct enough to warrant different designs. Like I said, I’m not a designer, and whether the device meets the demands of Pro users comes down to whether it supports the technical features they need. It doesn’t matter if the PCIe slots are vertical, horizontal, sideways or backwards, or even if they’re mounted on opposite sides of the enclosure as long as they meet the technical and functional needs outlined above. Likewise for the RAM and all other components.

I was inspired to this approach by a comment from a moderator over at tonymacx86, which suggested Apple release a mini-ITX form factor device. It would be great for the Mac gaming community and many enthusiasts/independent pros to have an even smaller, cheaper “Pro” desktop. Here’s how such a device might look:

  • Single socket Intel processor. Configurable 2 or 4 cores.
  • 2x DDR4 ECC RAM slots. Configurable 16GB to 256GB. Make the base configuration 1x16GB so users don’t have to toss their factory RAM to upgrade a bit.
  • 1x PCIe 3.0 x16 dual-height slot. Configurable with choice of graphics card (None, Single). Maybe one /8 slot as well (or dual-purpose an M.2 slot).
  • 2x Thunderbolt 3/USB-C ports.

I imagine this device might sport dual 1GbE instead of dual 10GbE to lower the price point, and 2x M.2 slot instead of 4x. The latest generation of Gigabyte’s Gaming-oriented mini-ITX motherboard boasts many of these features.

However, the needs of the middle and high end of the Pro market would not be met by such a device, and offering only it and the higher spec outlined above is too much space between their capabilities. Obviously the higher spec device is a must, because if it doesn’t exist then those Pros are jumping ship for custom built PCs. So I consider the focus for development should go to the two builds described above. This third configuration/model is more of an “I wish” product.

Here’s a feature comparison matrix, referring to the three devices by their most-similar PC form-factor names.

mini-ITX Mid Tower Full Tower
PCIe 3.0 x16 Dual-Width Slots

1

2

4

GPUs Integrated, Single Integrated, Single, Dual Integrated, Single, Dual
CPU Sockets

1

1

2

CPU Cores (max)

6

8

16

RAM Slots

2

4

8

Max RAM 256GB 512GB 1024GB
Thunderbolt 3/USB-C

2

4

8

PCIe M.2 Slots

2

4

4

LAN Dual 1GbE Dual 10GbE Dual 10GbE
HDMI 2.1

1

2

2

Comments are open. If you’re a Pro Mac user, please let me know which configuration you would choose, what BTO options you would prefer, and what third-party hardware and peripherals you would connect. I’d like to get more direct requirements from actual users so I can better refine this proposal to meet everyone’s needs.
OpenGL on iOS: Device Orientation Changes Without All The Stretching

Once you get your first OpenGL view working on an iPhone or iPad, one of the first things you’ll likely notice is that when you rotate your device, the rendered image in that view stretches during the animated rotation of the display. This post explains why this happens, and what you can do to deal with it. Example code can be found at https://github.com/codefromabove/OpenGLDeviceRotation.

Continue reading OpenGL on iOS: Device Orientation Changes Without All The Stretching

Automatically Update Your Copyright Notice

Who wants to manually update the copyright date on their active blog? Nobody. Even though it’s best practice to keep your copyright date current with the last revision of a website, this can be difficult with an active blog.

Worse is the fact that it only has to be done once annually. If your blog is active and you’re paying attention, there’s at least a few days delay while you recover from the New Year before you bother updating the copyright date.

Everything else on the website is generated dynamically, so why not the copyright date? Sure, we could just have it display the current year, and that’s fine as long as you update the site at least once every year, but it’s not guaranteed. Besides, there’s an even cooler way, at least if you’re using WordPress. It involves the descriptively named get_lastpostmodified() function and PHP >=5.3’s DateTime class:

<small>©<?php $datetime = new DateTime(get_lastpostmodified());
         echo $datetime->format('Y'); ?> [Name]</small>

First, we grab the timestamp of the most recent update to any post. Then we feed that into a new DateTime object. Finally, we print out just the year.

Unfortunately, get_lastpostmodified() does not support UTC, only GMT, otherwise I’d use that. Annoyingly, the WordPress devs seem to consider these two time zones interchangeable. For our purposes, GMT and UTC are close enough, and the resultant code is quite similar:

<small>©<?php $datetime = new DateTime(get_lastpostmodified('gmt'), new DateTimeZone('gmt'));
         echo $datetime->format('Y'); ?> [Name]</small>

And there you go, a dynamically updating copyright notice suitable for your blog footer, that will keep the date current with the date of the last update to your blog.

WordPress Custom Taxonomy Archive for Custom Post Types

Part of a series of posts on advanced WordPress customization, this article covers the implementation of a WordPress Custom Taxonomy archive for Custom Post Types.

Desired Effect

What we want in the end are URLs that look like example.com/post-type/taxonomy-name/taxonomy-term leading to a listing of Custom Post Type objects. It’s like example.com/blog/tag/tutorial, but with Custom Post Type and Custom Taxonomy instead of the built-in “post” post type and “tag” taxonomy. Posts should reside at example.com/post-type/%postname%/.

Approaches

There are a couple approaches to implementing this functionality in WordPress. I’ve outlined the two potential approaches below, and then explain my solution.

Custom Permastruct, Manual Custom Query

One could use a Custom Field on the Custom Post Type to store the taxonomy name and term in a key-value store. One could then create a new custom rewrite tag via add_rewrite_tag() to allow rewriting of taxonomy-name/taxonomy-term to a GET query variable. Finally, one could write a plugin and/or customize their theme to extract the newly-added query variable and use it to construct a custom SQL query or WP_Query() object. This would hijack The Loop causing it to only return appropriate posts.

Drawbacks, Other Notes: This approach relies on a Custom Field on each Custom Post with the proper name and value. This means if something is wrong there, the post won’t show up properly. There is no unified system to view all the values of that Custom Field across all posts, and no way to automatically rename them if the need arose. One could use the Advanced Custom Fields plugin to ameliorate some of these issues, but it’s not ideal. Furthermore, this system requires heavy customization of the Theme, which makes it much less portable. Not only with the custom query parsing and execution, but you must also write a custom generator for the taxonomy term links and such.

Hijack Existing Functionality in register_post_type() and register_taxonomy()

register_post_type() and register_taxonomy() already make calls to add_permastruct(), add_rewrite_tag(), and add_rewrite_rule(), so why can’t we hijack those to achieve the desired result? It turns out that you can, but it’s not as straightforward as you might expect. Details below.

Drawbacks, Other Notes: This approach utilizes the taxonomy system, and so benefits from all of the functionality and UI already written for it. Furthermore, it does not require such heavy customization of the theme, making it more portable. So far, the only drawback is that I haven’t figured out how to support multiple taxonomies.

Solution

It took a lot of digging, but I finally located most of the solution on the WordPress StackExchange. It relies on a little bit of under-documented functionality in register_post_type() and register_taxonomy() to hijack the behind-the-scenes calls to add_permastruct() and friends and achieve the desired outcome. I documented this solution on the WordPress support forums. The first step is to register the custom taxonomy with a few special modifications to the $args, particularly rewrite:

// Register Custom Taxonomy
function example_taxonomy_init()  {
    // All Labels as usual
    $labels = array(
        'name'                       => 'Example Taxonomy',
        'singular_name'              => 'Example Taxonomy',
        'menu_name'                  => 'Example Taxonomy',
        'all_items'                  => 'All Example Taxonomies',
        'parent_item'                => 'Parent Example Taxonomy',
        'parent_item_colon'          => 'Parent Example Taxonomy:',
        'new_item_name'              => 'New Example Taxonomy Name',
        'add_new_item'               => 'Add New Example Taxonomy',
        'edit_item'                  => 'Edit Example Taxonomy',
        'update_item'                => 'Update Example Taxonomy',
        'separate_items_with_commas' => 'Separate example taxonomies with commas',
        'search_items'               => 'Search example taxonomies',
        'add_or_remove_items'        => 'Add or remove example taxonomies',
        'choose_from_most_used'      => 'Choose from the most used example taxonomies',
    );
    // IMPORTANT!
    $rewrite = array(
        'slug' => 'example-custom-post/example-taxonomy', // this kicks add_permastruct
        'with_front' => false, // we don't want this appearing under /blog/ or something
    );
    $args = array(
        'labels'                     => $labels,
        'hierarchical'               => true, // behave like pages, not posts; I have not tested post-style archives, but they should work
        'public'                     => true,
        'show_ui'                    => true,
        'show_admin_column'          => true,
        'show_in_nav_menus'          => true,
        'show_tagcloud'              => true,
        'rewrite'                    => $rewrite,
    );
    register_taxonomy( 'example-taxonomy', 'example-custom-post', $args ); // we only want this taxonomy to link to our custom post type, nothing else
}
// Hook into the 'init' action
add_action( 'init', 'example_taxonomy_init', 0 );

What this does is hijack the call to add_permastruct() on line 375 of taxonomy.php in the register_post_type() definition which WordPress generates the taxonomy archive page from. We also hijack add_rewrite_tag() on like 374 which creates the rewriting tag that we reference next. slug must be in the form <custom-post-type-name>/<custom-taxonomy-name> where <custom-post-type-name> is the value of the $post_type parameter when you call register_post_type() and <custom-taxonomy-name> is the value of the $taxonomy parameter in register_taxonomy(). This is the call that actually creates the custom taxonomy archive. Then we register our custom post type, with a few modifications to $args, particularly to rewrite and has_archive:

// Register Custom Post Type
function example_custom_post_init() {
    // All Labels as usual
    $labels = array(
        'name'                => 'Example Custom Posts',
        'singular_name'       => 'Example Custom Post',
        'menu_name'           => 'Example Custom Posts',
        'parent_item_colon'   => 'Example Custom Post:',
        'all_items'           => 'All Example Custom Posts',
        'view_item'           => 'View Example Custom Post',
        'add_new_item'        => 'Add New Example Custom Post',
        'add_new'             => 'New Example Custom Post',
        'edit_item'           => 'Edit Example Custom Post',
        'update_item'         => 'Update Example Custom Post',
        'search_items'        => 'Search example custom posts',
        'not_found'           => 'No example custom posts found',
        'not_found_in_trash'  => 'No example custom posts found in Trash'
    );
    // IMPORTANT!
    $rewrite = array(
        'slug'                => 'example-custom-posts/%example-taxonomy%', // keep the % characters
        'with_front'          => false,
    );
    $args = array(
        'label'               => 'example-custom-post',
        'description'         => 'An example custom post type',
        'labels'              => $labels,
        'supports'            => array( 'title', 'editor', 'excerpt', 'thumbnail', ),
        'taxonomies'          => array( 'example_taxonomy' ), // link to our custom taxonomy
        'hierarchical'        => false, // behave like tags, not categories; can be either, but I have not tested hierarchical taxonomy archives
        'public'              => true,
        'show_ui'             => true,
        'show_in_menu'        => true,
        'show_in_nav_menus'   => true,
        'show_in_admin_bar'   => true,
        'menu_position'       => 5,
        'menu_icon'           => '',
        'can_export'          => true,
        'has_archive'         => 'example-custom-posts', // IMPORTANT!
        'exclude_from_search' => false,
        'publicly_queryable'  => true,
        'capability_type'     => 'page',
        'rewrite'             => $rewrite
    );
    register_post_type( 'example-custom-post', $args );
}
// Hook into the 'init' action
add_action( 'init', 'example_custom_post_init', 0 );

Since we’ve already tied the custom post type and custom taxonomy together in their initialization, we don’t have to call register_taxonomy_for_post_type(). Modifying $rewrite['slug'] allows us to hijack the call to add_rewrite_rule() on line 1309 of post.php with %example-taxonomy%, which is the name of the rewrite tag we created in the call to register_taxonomy() above; this rewrites example.com/example-custom-posts/example-taxonomy/term/post-name to example.com/example-custom-posts/post-name, though we could change that. Importantly, we must set has_archive to something other than true, this creates the regular custom post type archive index (see here). Last, we hijack add_permastruct() again to create the regular index for the custom post type. It took me a while to figure out exactly why and how this worked, and I hope that by documenting it here others may benefit.

Programmatically Adding an Icon to a Folder or File

I recently had the need to programmatically add an icon to a folder in OS X, with the source being a PNG image file. This arose in the context of setting up an app installer, which needed to set custom Finder icons on several folders. Another context in which a programmatic solution would be useful would be in a running desktop application, where new folders needing custom icons might be created (or their icons be modified for some reason).

Doing this programmatically should be trivially easy, but there are problems with solutions that are commonly provided in answer to this need. This post discusses some of those solutions and their shortcomings, and presents a usable workaround or two. It’s also a plea (or two) for help…

Continue reading Programmatically Adding an Icon to a Folder or File

“I don’t see Apple dramatically improving or replacing Objective C anytime soon.”

Jason Brennan, in February of 2014:

I don’t see Apple dramatically improving or replacing Objective C anytime soon.

Five months later:

Apple introduced a boatload of new consumer features for OS X and iOS today, but one of the biggest announcements for developers could be its new programming language, Swift. Craig Federighi just announced it, saying that Apple is trying to build a language that doesn’t have the “baggage” of Objective-C, a programming language that came from NeXt that has formed the basis of OS X and eventually iOS.

I’ll have this in a bread bowl.

Cocoa: Dynamically Loading Resources From an “External” Bundle

In a typical OS X application, UI elements are often created in Interface Builder and stored inside the application bundle, in the form of one or more nib files. Bundles are central to Apple’s application ecosystem, and the documentation on them is extensive: The Bundle Programming Guide and Code Loading Programming Topics, for example, describe how to create frameworks and application plug-ins, how to load code and resources, and on and on. Impressive, but rather daunting, and the examples they provide often obfuscate the basics. This post shows a very simple example of how an “external” bundle can be loaded on demand, and provide functionality and UI elements to the main program. This is a detailed, step-by-step tutorial that explains a fairly simple use of bundles, so the intended audience is Cocoa programmers who have enough experience to create custom window or view controllers, but who have not yet dealt with creating or using bundles that are created separately from the application.

Code for the projects can be found on github.

Continue reading Cocoa: Dynamically Loading Resources From an “External” Bundle