One useful command line “pattern” is using find and xargs together. For example, to search for instances of “banana” in a folder hierarchy containing text files, one can do this:
find . -name "*.txt" | xargs grep banana
If the paths contain spaces, this will fail because xargs by default uses spaces as delimiters. For example, a path ./folder1/OS Foo/someFile.txt will yield this error:
grep: ./folder1/OS: No such file or directory
grep: Foo/someFile.txt: No such file or directory
The solution is to use find’s -print0 argument, in conjunction with xarg’s -0 argument:
find . -name "*.txt" -print0 | xargs -0 grep banana
Used like this, find outputs the path with a terminating ASCII NUL character, and xargs uses NUL as a delimiter, so paths with spaces no longer cause problems
Normally, shell scripts can only be executed from the command line. For convenience, especially for users who don’t use Terminal, shell scripts can be made double-clickable in the Finder: simply have the suffix be “.command”, and change the permissions to read/execute.
By default, such scripts execute within the user’s home directory. In some cases, you might want the script to run in its own directory, or some arbitrary directory (such as, say, /tmp). Such a path might contain shell-hostile things like spaces, special characters, etc., and so this common shell technique will not work:
cd `dirname $0`
The trick is to do this:
#!/bin/sh
cd "$(dirname "$0")"
@AdamBetts asked:
In Yosemite is there no way to set shortcut/mouse button for Today/Notification separately? Seems odd to have no option for that.
Turns out there’s no “proper” way to do this. So, we resort to Apple’s recently revamped Scripting Tools to kludge together a solution that just clicks the UI elements.
With the help of the trusty “Accessibility Inspector.app”, we can work out the following AppleScript methods:
on displayNotificationCenterToday()
	tell application "System Events"
		click menu bar item "Notification Center" of menu bar 2 of process "SystemUIServer"
		click radio button "Today" of radio group 1 of window "NotificationTableWindow" of process "NotificationCenter"
	end tell
end displayNotificationCenterToday

on displayNotificationCenterNotifications()
	tell application "System Events"
		click menu bar item "Notification Center" of menu bar 2 of process "SystemUIServer"
		click radio button "Notifications" of radio group 1 of window "NotificationTableWindow" of process "NotificationCenter"
	end tell
end displayNotificationCenterNotifications

-- this plus Accessibility Inspector is how I figured out what to click
--tell application "System Events"
--	get properties of every menu bar item of every menu bar of process "SystemUIServer"
-- get properties of menu bar 2 of process "SystemUIServer"
--	click menu bar item "Notification Center" of menu bar 2 of process "SystemUIServer"
--	click radio button "Today" of radio group 1 of window "NotificationTableWindow" of process "NotificationCenter"
--end tell

--displayNotificationCenterNotifications()
--displayNotificationCenterToday()
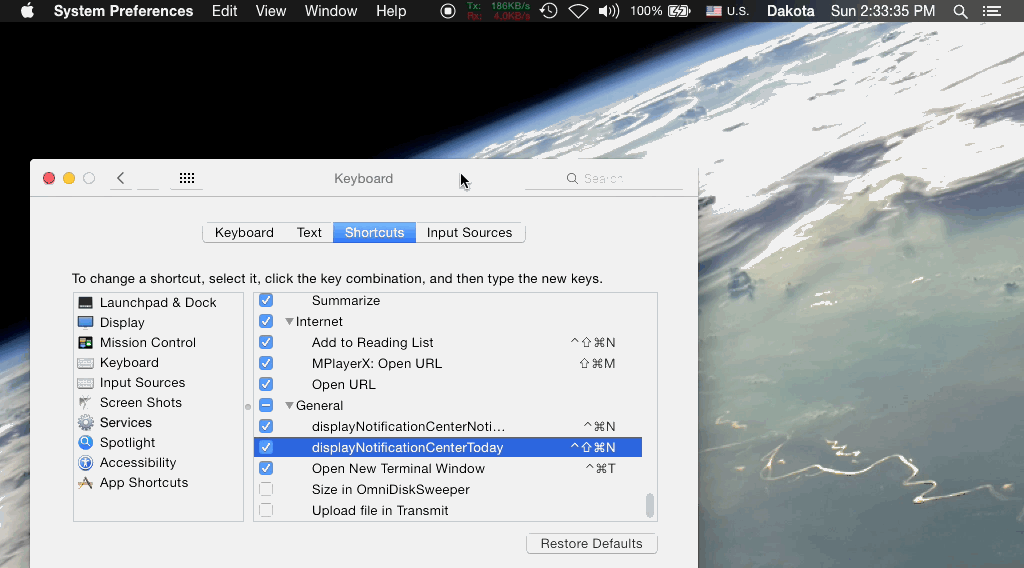
To call these methods from the keyboard, we hook into OSX’s system-wide Services by creating a custom Service in Automator that takes no input from all applications. We can then assign a keyboard shortcut in System Preferences > Keyboard > Shortcuts > Services. The result:
Here’s a package with the two services you need: displayNotificationCenterPanels.zip
Assume you have a variable that’s a C function pointer, and that function may directly or indirectly invoke some GUI code:
typedef void (*MyFunc)(void);
MyFunc func = ...
In a threaded environment, it would be unsafe to execute this function from a background thread. Objective-C’s NSObject has a selector performSelectorOnMainThread that we can take advantage of, even though our C function isn’t a selector. Simply create a wrapper object:
@interface TestObject : NSObject {
    MyFunc func;
}
@property MyFunc func;
- (void)invoke;
@end

@implementation TestObject
@synthesize func;
-(void)invoke {
    if (func)
        func();
}
@end
and when you need to execute the C function, create an instance, assign the function pointer, and execute the method that calls it:
TestObject *testObject = [[TestObject alloc] init];
testObject.func = func;
[testObject performSelectorOnMainThread:@selector(invoke)
                             withObject:nil
                          waitUntilDone:YES];
Added bonus: for a much more general solution, see these two blog posts: Invoke any Method on any Thread and Performing any Selector on the Main Thread.
Sometimes it’s convenient to distribute low-security information with a small added layer of protection, mostly to prevent casual eavesdropping. In this case, you might consider wrapping your files in a ZIP container and encrypting them. Simply:
zip -e <files> <archive.zip>
Things to know: ZIP encryption does not encrypt the whole archive container, but rather the individual files within that container. This means that, without knowing the password, someone can still list the archive’s contents, read any file comments, even add and remove files to the archive. This Security StackExchange thread has a discussion of the implications. For greater security, you may want to create an AES 256-bit encrypted disk image.
When you need to distribute a package of encrypted data more securely than possible with ZIP Encryption, or want a smoother workflow for encrypting some data when you’re not using it, you might consider creating an Encrypted Sparse Disk Image:
- Open Disk Utility (/Applications/Utilities/Disk Utility),
- Select File→New→Blank Disk Image…,
- Choose a large enough Size to contain all your data (be aware that the larger you make the image, the slower it will be to mount and unmount; the image will only take up as much space on disk as its encrypted contents; you may increase the image size later),
- Choose sparse bundle disk image as the Image Format, and choose the level of encryption you require,
- Choose a password to encrypt the image. Make sure to uncheck the Remember password in my Keychain box if you want to be prompted each time you attempt to mount the disk, and
- Click OK. Disk Utility will create a sparse bundle to hold your files. Don’t forget to delete the original folder.
Annoyingly, there used to be an option to create an automatically resizing Encrypted Disk Image using an existing folder as a base, but that’s disappeared in Mavericks.
Commonly associated with OpenVPN issues, but also visible from cURL and other low level networking tools, this error occurs when OSX’s TCP stack routing table has become corrupted. I have experienced this issue frequently when using OpenVPN on flaky WLANs. To fix it, you need to flush the routing table. Either reboot, or:
sudo ifconfig en0 down # take the networking interface down
sudo route flush # flush the route table
sudo ifconfig en0 up # take the interface back online
Where en0 is the networking interface that caused this problem. Use ifconfig -L to list your networking interfaces and figure out which one corresponds to WiFi/Ethernet. (Note: en0 is typically Ethernet, but on MacBooks without hardware Ethernet, en0 is WiFi.)
On OS X, attempting to use “ssh -Y” to another Mac can fail with this sort of error:
Warning: No xauth data; using fake authentication data for X11 forwarding.X11 forwarding request failed on channel 0
This is due to an inadequate configuration. The fix is to add these lines to these two files on both Macs:
/etc/sshd_config
- X11Forwarding yes
- XauthLocation /opt/X11/bin/xauth
/etc/ssh_config
- XauthLocation /opt/X11/bin/xauth
From Divan Visagie with some slight modifications.
Creating a zip archive of a folder on OS X by using the “Compress” menu item, or on the command line using the “zip” command in the usual way, will include all “.DS_Store” files in the folder. You can avoid this by invoking the zip command like this:
zip -r MyFolder.zip MyFolder -x "*.DS_Store"