The Hyperconverged Homelab—Windows VM Gaming

Shows "NVIDIA GeForce GTX 1060" in the Windows 10 Device Manager alongside the "VMWare SVGA 3D" display device.
An NVIDIA GeForce GTX 1060 3GB successfully passed through to a Windows 10 VM under ESXi 6.7.

With the last couple of major revision to VMWare’s enterprise virtualization platform, ESXi, it has become relatively easy to robustly pass through consumer NVIDIA GPUs for use in virtualized gaming and other consumer/enthusiast configurations. However, although information on how to correctly configure this may be widely available, it’s usually poorly explained. After successfully configuring NVIDIA passthrough and driver support on a Windows 10 client, here’s my rundown of the requirements, process, and potential issues.

What You Need

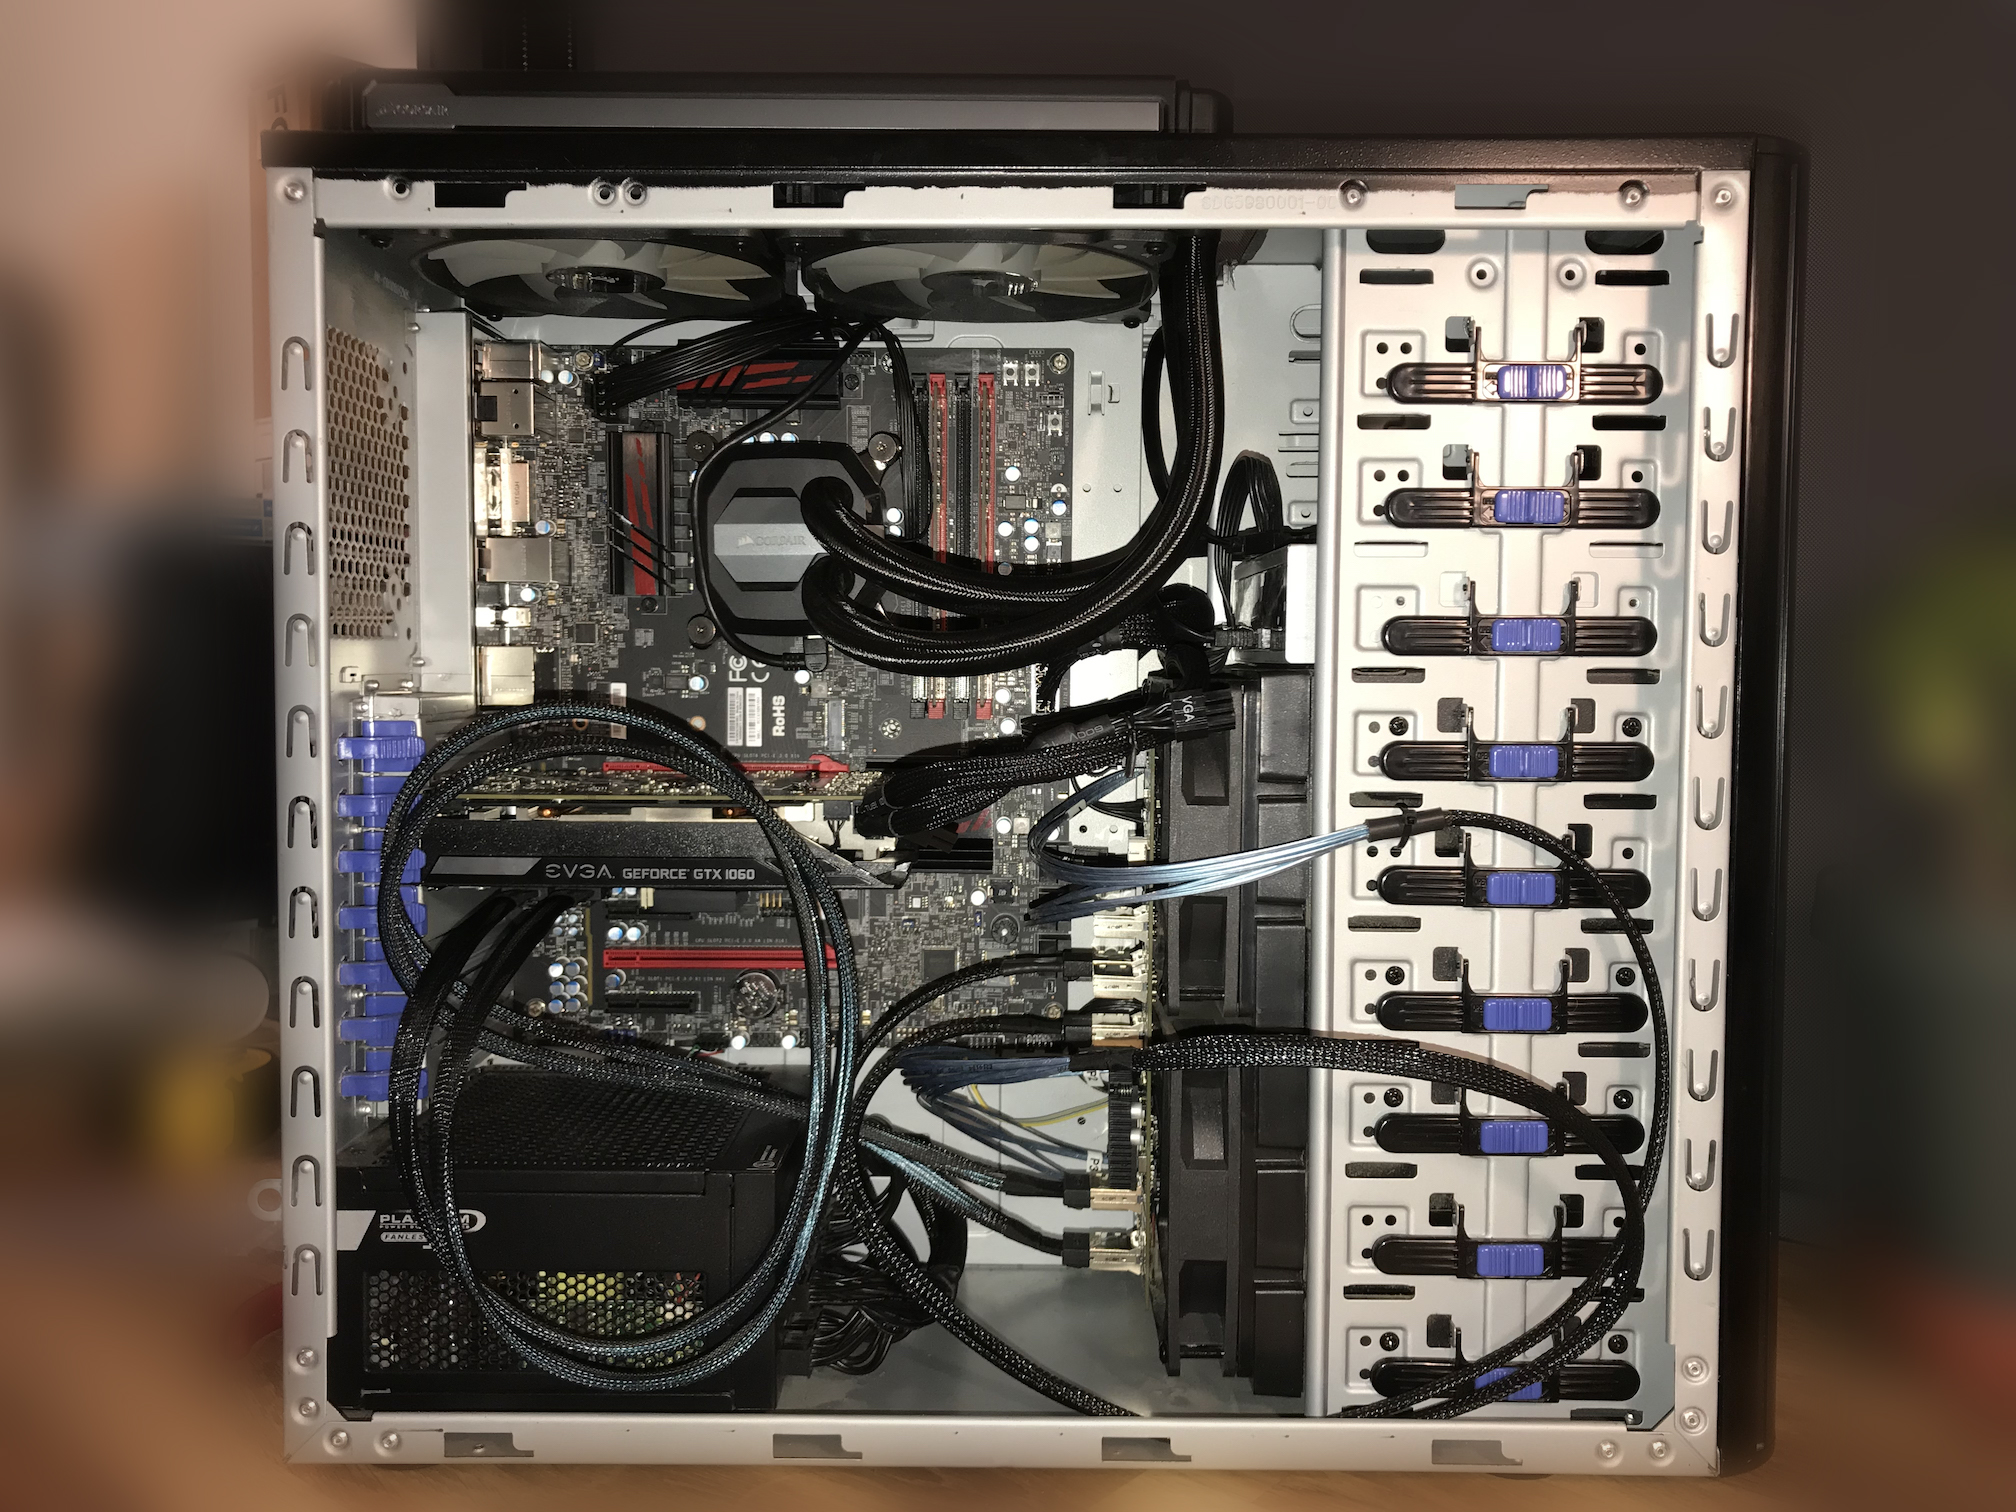
  • A virtualization server with an available PCIe slot.
  • An NVIDIA consumer graphics card. This should work on any card that’s still supported by NVIDIA’s drivers, without requiring the use of a specific driver version or unsigned driver hack.
  • ESXi 6.5 or later.
  • A Windows 10 VM. If you don’t have one, I’ll be covering cheap legitimate Windows 10 licenses in a future post.

How to Proceed

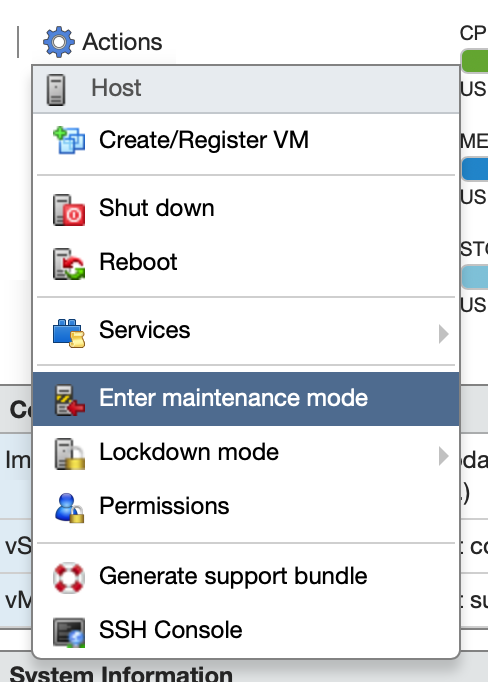
Put the ESXi host into Maintenance Mode, shut down the server, and install the GPU. We’ll have to reboot the ESXi host fully at least once, so set Maintenance Mode to prevent any VMs from automatically booting.

Reboot the server and configure the BIOS. If you’re using a server motherboard, you probably don’t have to change anything. However, those using a consumer desktop motherboard may need to change their default display device settings if they’ve been using the onboard graphics of their CPU. Note the following requirements: Intel Virtualization Technology (vT-d) must be enabled to support PCIe device passthrough, the GPU must be enabled as the primary display device, and a display may need to be connected during boot. If you’ve made any changes, save and reboot the server. Caveats: I have not yet been successful at simultaneously passing through both the integrated graphics on my Intel CPU and any external GPU. I believe that this is an issue with my consumer motherboard BIOS only allowing one of the graphics devices to be enabled at a time, but I don’t have a second PCIe GPU to test this theory with. I have confirmed passthrough of the Skylake onboard Intel HD Graphics 530.

Configure PCIe device passthrough. Now that you’ve fully booted the server, open up the ESXi web client. Select Host→Manage→Hardware→PCI Devices. You should see your GPU in the device list. As such:

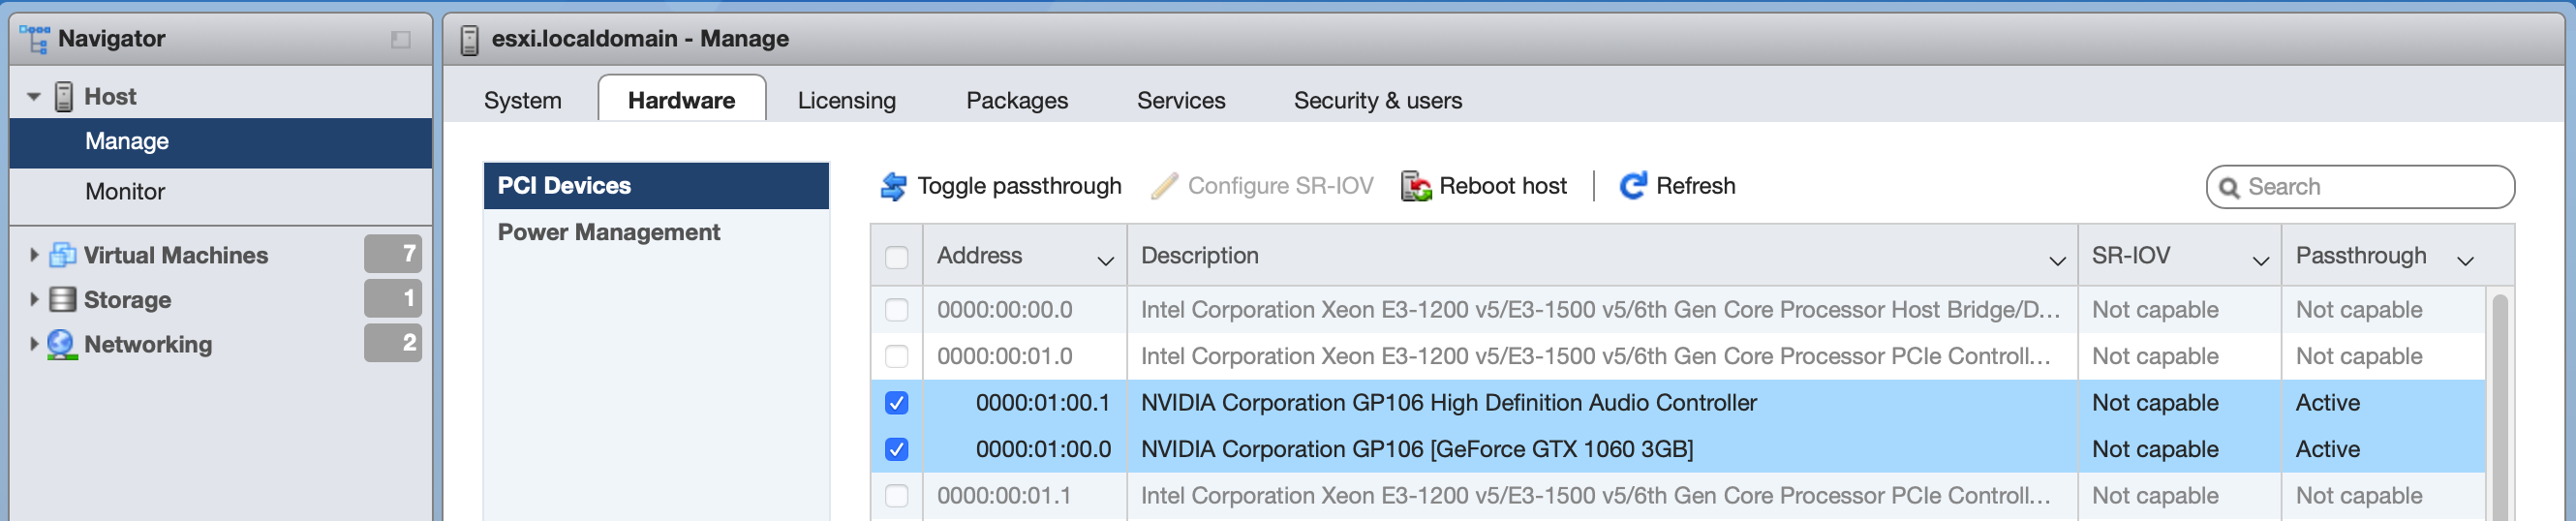
If not, shut down the server and ensure that the card is fully seated and that you’ve correctly configured your BIOS. Select the GPU in the Devices list and click “Toggle Passthrough”. For NVIDIA GTX series with HDMI audio, you’ll also see an onboard high definition audio device, which may also be selected when you select the GPU itself. These should be treated as a single device, always passed through to the same VM. Ensure that you enable passthrough on both.

Reboot the server. A reboot is necessary to enable PCI Device passthrough. If you’re using a consumer motherboard with the GPU selected as your primary display, you will lose access to the hardware console part-way through the boot process. This will occur at “dma_mapper_iommu loaded successfully”, which is the PCI device passthrough module. When ESXi loads this module with a configuration for passthrough, it will take control of the passed-through device so that it can be made available to VMs. If the passed-through device is set as your primary display when ESXi boots, it will simply cut out the display at this point. However, ESXi will still boot (barring any other errors) and run just fine.

You can now remove the ESXi host from Maintenance Mode.

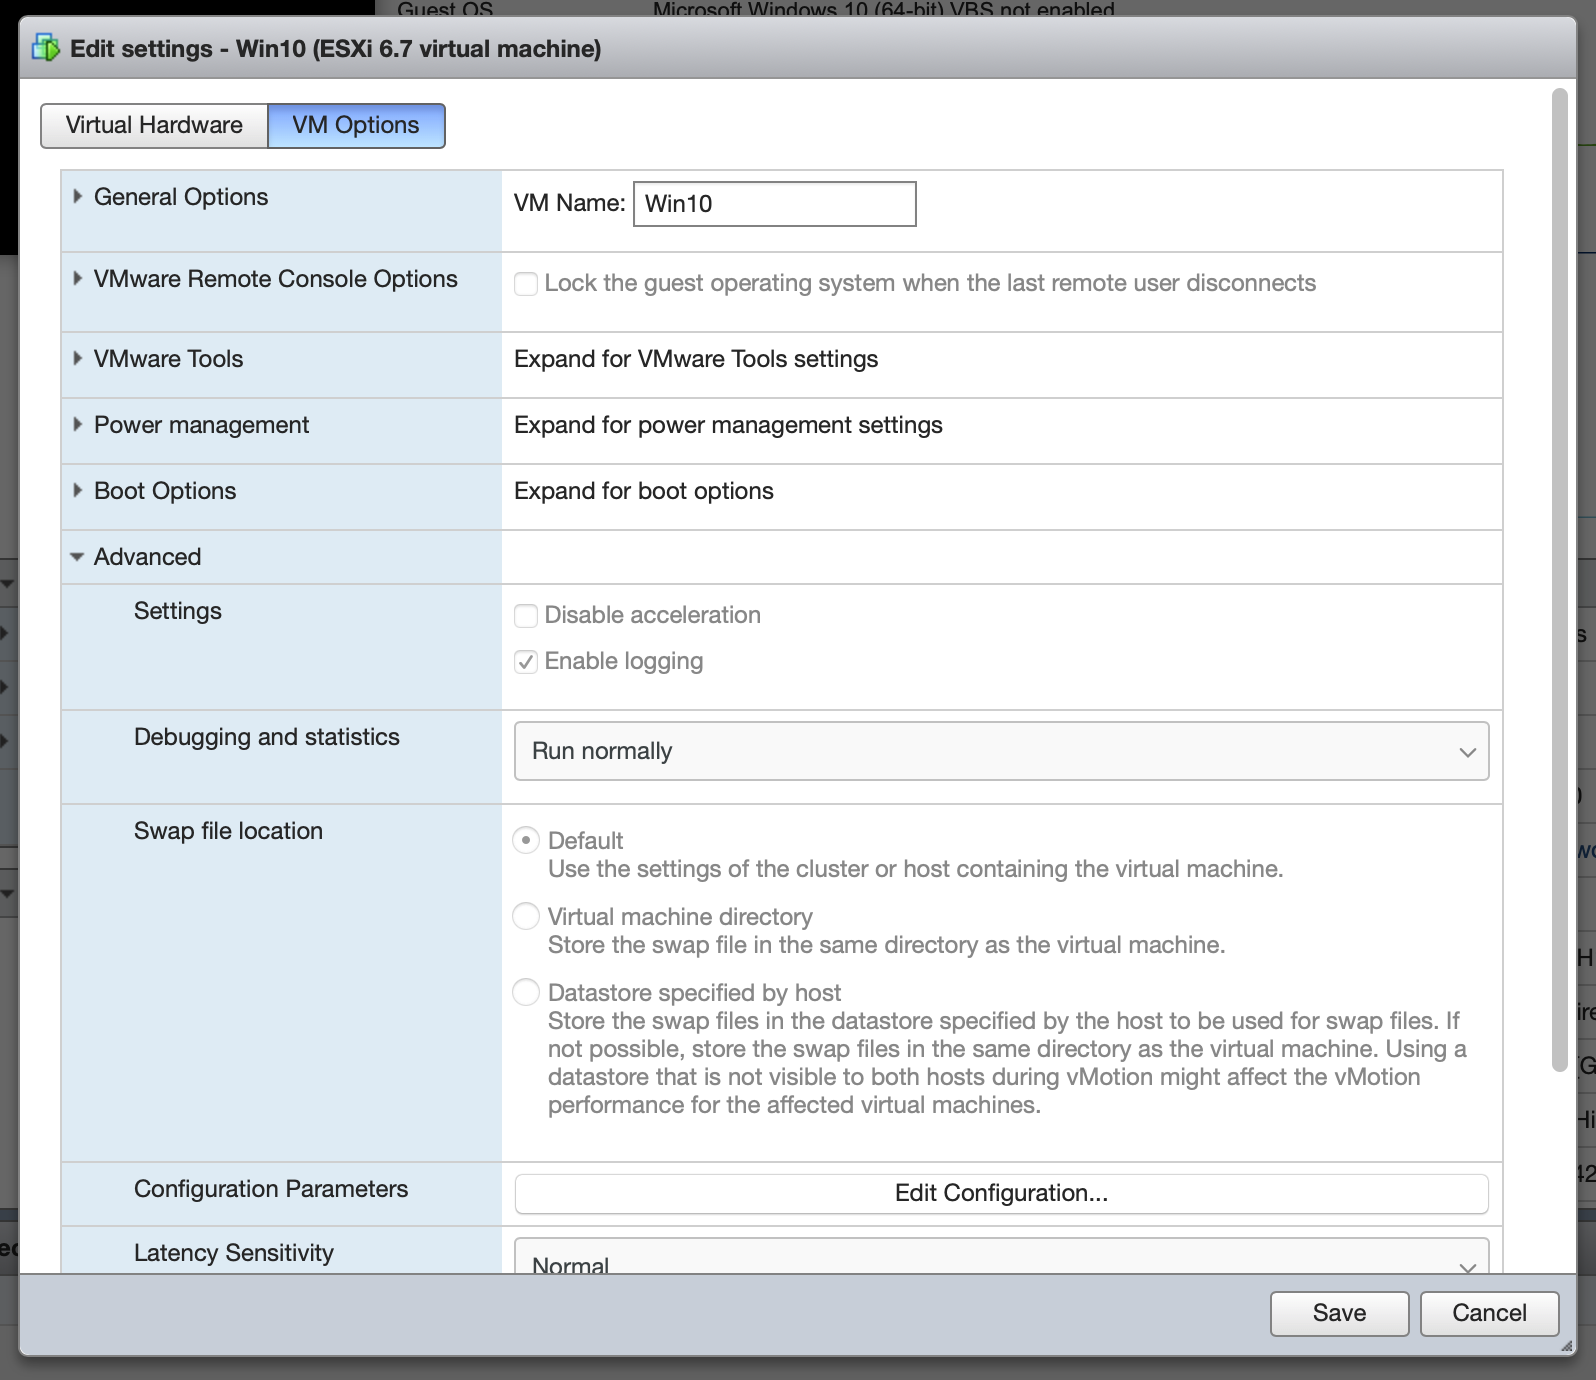
Configure PCI Device Passthrough. While it is powered down, open up the settings for your Windows 10 VM. First, add the GPU and its associated audio device under Virtual Hardware→Add other device→PCI Device. You must also allocate all of your VM’s RAM at this point, since PCIe RAM mapping doesn’t work properly with dynamically allocated RAM. Ensure that you have reserved all guest memory. It shouldn’t be necessary to lock it, but it won’t hurt. Save and close the settings window to repopulate the Advanced Settings dialog.

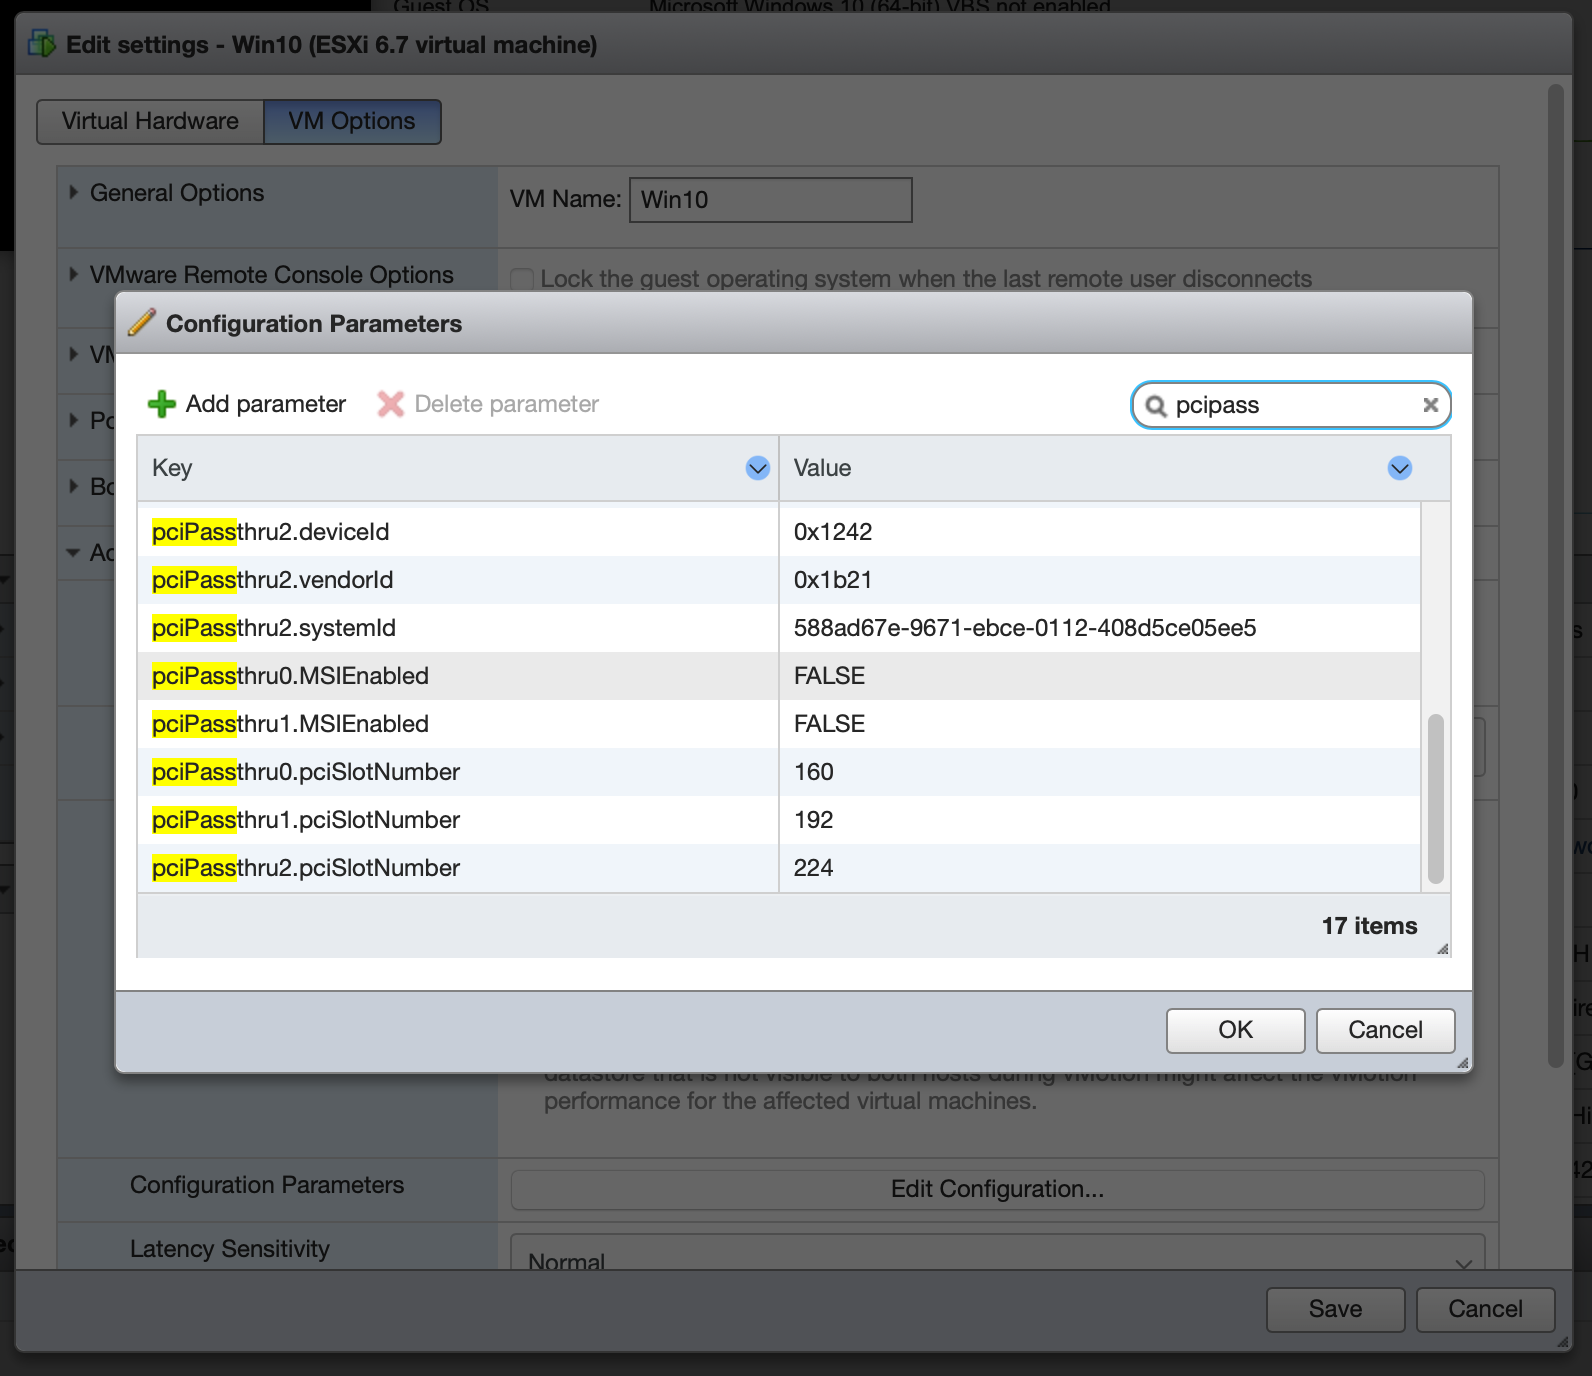
Configure Advanced Settings. Reopen the “Edit settings” dialog and select VM Options→Advanced→Edit Configuration. There are a couple flags which need to be added. For the GPU and its audio device, we have to disable Message Signaled Interrupts by setting pciPassthruX.MSIEnabled=FALSE for both devices, where X is the device passthrough number (zero-indexed, usually 0 and 1 if they’re the only PCI devices passed through to the VM). This requirement and procedure is documented by NVIDIA, who claim that it only applies to ESXi 5.0 and 5.5. However, in my configuration, this issue persists in 6.5 and 6.7, and results in lost interrupts which cause the display driver to flicker and crash, and the audio driver to stutter. This may be affected by BIOS PCI device setting for firmware mode being set to legacy (instead of EFI), but I don’t know.

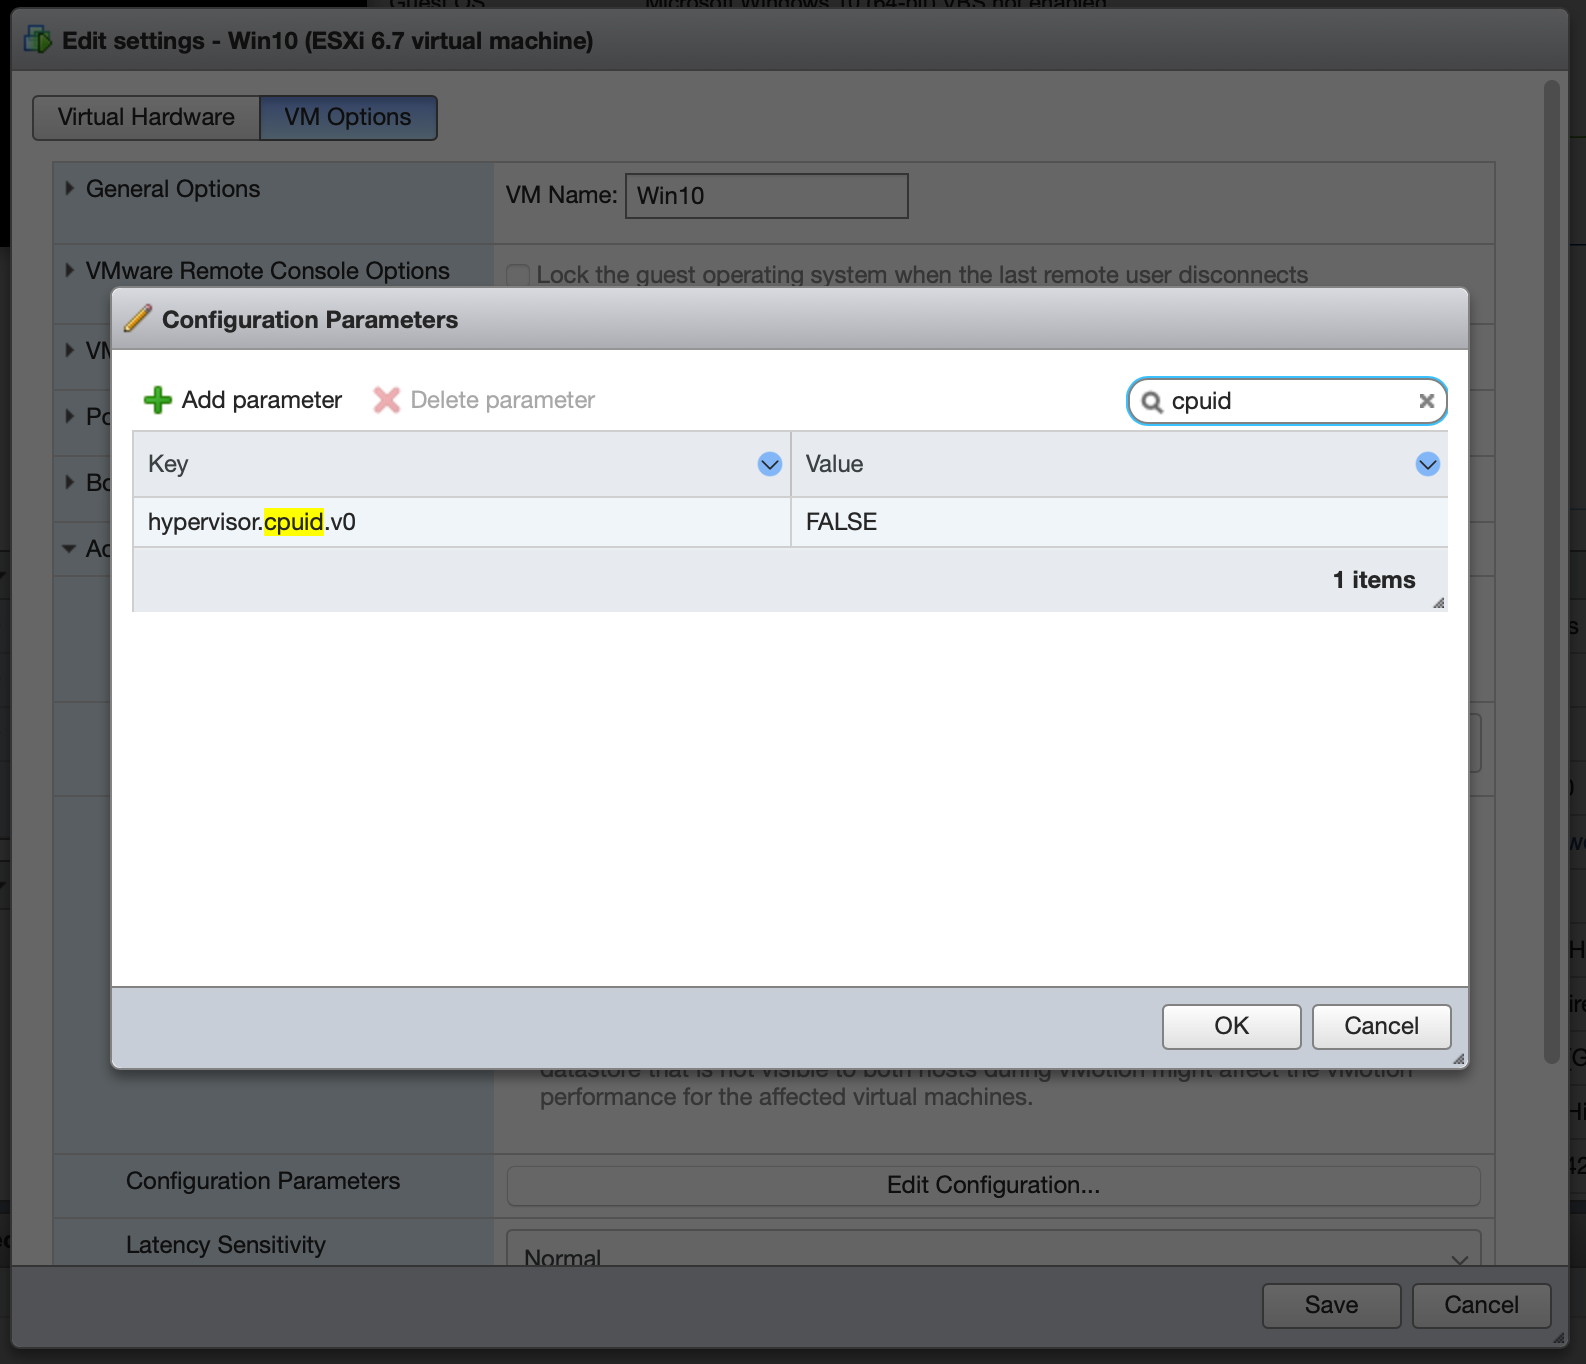
Next, configure hypervisor masking by setting hypervisor.cpuid.v0=FALSE. This prevents the VM OS from detecting that it’s being run under virtualization, which is necessary to prevent the NVIDIA driver from crashing.

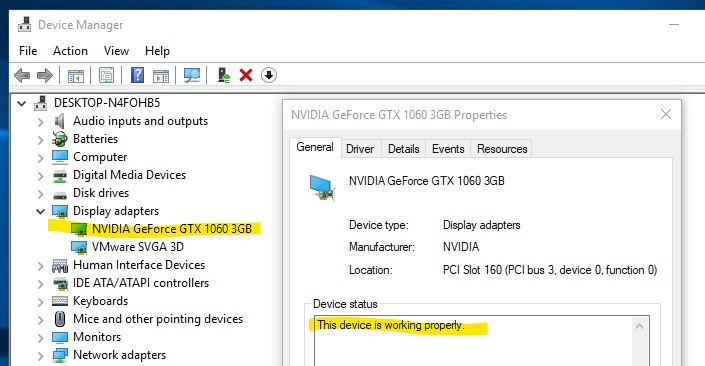
Now you should be able to boot the Windows VM and simply install the official NVIDIA drivers as normal! Behold your success, the NVIDIA driver running under ESXi!

An NVIDIA GeForce GTX 1060 3GB successfully passed through to a Windows 10 VM under ESXi 6.7.

In my configuration, I am able to run 3DMark Time Spy surprisingly well, with a tolerable 25–30fps throughout most of both graphics tests at 1080p, giving a graphics score of 4021. However, performance is dramatically CPU-constrained due to the i5-6500T’s low base clock and failure to properly Turbo in my current configuration. The physics test reflects this with an appalling framerate of around 4 fps and a CPU score of 1220. Overall, leading to a score of 2990.

An overall mediocre result due to appalling CPU performance.

We’ll see if some improvement cannot be achieved with a little judicious CPU overclocking.

Update: 26 Feb 2019

After extensive fiddling with various BIOS settings, I am still unable to get ESXi to play nice with passing through both the NVIDIA GPU and the onboard Intel GPU. I have, however, recovered the ESXi boot/console display, which no longer hangs at mmio initialization after I set the PCIe device option rom execution to EFI. This behavior reverts if I set “Video option ROM” to any value other than “Legacy”. Anyways, back to GPU troubles:

I have confirmed that this is not a hardware compatibility/functionality or configuration issue by booting Ubuntu 18.10 on the server, which is able to utilize both display devices by default. There is no problem whatsoever in having both GPUs enabled in the BIOS, which are then utilized by Ubuntu. It also respects the BIOS setting for Primary Display, and which is set as primary in BIOS has no impact on functionality.

I therefore conclude that there’s an issue with ESXi when using multiple GPUs. Although both GPUs show up correctly in the hardware listing, and can be set to passthrough, the NVIDIA GPU cannot be used if the Intel GPU is enabled in the BIOS (for example, if Intel GPU is also enabled in BIOS then I get Error 43 under Windows VM with NVIDIA GPU passed-through; disable Intel GPU and the NVIDIA card works fine). I have other PCIe devices connected and passed through which don’t seem to make any difference.

However, I note something strange: when I change the Intel GPU enabled/disabled in the BIOS, one of my other PCIe cards (LSI2008 SAS HBA) gets “lost”. It still shows up in the Host hardware list, but the VM hardware configuration line is blank. I believe it may be changing PCIe address, which is odd.

Can anyone report success getting two GPUs of any variety to pass through in ESXi? Leave a comment on the Reddit thread. I don’t have another PCIe graphics card on hand to test with, and due to hardware constraints would have to run one card at only x4, which is not ideal. And people want way too much money for their crummy old graphics cards.

Next test, which I will do some other day because I am tired of power cycling my system, will be switching which PCIe slot the GPU is in, on the off chance that having it in a non-primary slot will make some difference in the PCIe device tree that makes things behave better for ESXi.

The Hyperconverged Homelab—Upgrades

Thanks to the magic of Craigslist and eBay.

After two years of trouble-free service running FreeNAS and Ubiquiti’s UniFi Controller under an Ubuntu Server 18.04 VM, it was finally time for some upgrades. Although I was able to expand my storage capacity by growing a vDev of old, small drives, I wanted to take this opportunity to future-proof and expand my capabilities.

Goals:

  • GPU for passthrough. My system has more capacity than needed for its primary tasks, so I want to try out VM gaming.
  • Better network monitoring and control.
  • Full-size motherboard. Although this project originally started life as a mini-ITX build, my needs have changed, and I am no longer size-constrained on my case.
  • More SATA devices. Using slow consumer spinning platters means I can put a large number of drives on a single HBA before exceeding the available bandwidth and creating a performance bottleneck.

As pictured, clockwise from upper left:

  • EVGA Superclocked GeForce GTX 1060 3GB—Craigslist, $140 with 2 years mfr. warranty, used/like-new
  • Ubiquiti UniFi 8-port Gigabit Managed Switch with 4 PoE (US-8-60W)—eBay, $109 shipped, new/open box
  • SuperMicro C7Z170-OCE-O LGA 1151 ATX Intel Motherboard—eBay, $165 shipped, new/old stock
  • Intel RES2CV240 24-Ports SAS / SATA 6.0Gbps RAID Expander Card—eBay, $149 shipped, new/open box

The GPU was selected by crawling Craigslist for every local listing with “GeForce”. I then constructed a spreadsheet of the listings and calculated the PassMark/$ score to find the best value. At 64 PassMarks per dollar, this EVGA card was one of the best value outside of 1080 and 1080TI models previously used for cryptocurrency mining. Crypto mining is to GPUs like drifting is to cars: you can do it safely, if you’re careful, but when buying second-hand the deals aren’t worth the potential headache of having a unit that’s been thrashed. The 1060 class cards also have enough performance to run current-gen games at decent settings.

I purchased the Unifi Switch because I was experiencing some bizarre network performance issues with the server. After way too much mucking around on the software side of things I discovered that it was just the consumer-grade Intel NIC on the server motherboard dying (as they are known to). I switched to the other, unused NIC (an Atheros unit) and my connectivity problems went away. It was too late to cancel the order, and I figured that it would be nice to have a managed switch with PoE anyways. Unfortunately it turns out my UAP-AC-LR was cheap for a reason: despite packaging to the contrary, it predates that model’s support for 802.3af standard PoE and requires 24V passive… Oh well, no real loss.

The motherboard was chosen by chance, as I was browsing Newegg for compatible models and was surprised to see that SuperMicro made a desktop gaming-oriented motherboard. A quick trip to eBay surprised me even more with this inexpensive new old stock unit, which I quickly purchased. Single 1GbE, no WiFi/BT, but with Thunderbolt-capable USB 3.1 module. Interesting possibilities abound.

The Intel SAS Expander I found by recommendation on one of the forums, either FreeNAS, ZFS, or ServeTheHome (I can’t recall). This model is particularly desirable not only for its performance to cost ratio, but because it supports dual uplink configuration. Two SAS ports can be used for transparent uplink to the HBA, doubling the throughput available compared to using a single channel uplink. Since 6Gb SAS transfers approximately 600MB/s, splitting it in half leaves 300MB/s available for each hard drive channel in simultaneous utilization. That’s enough to saturate my slow 5k drives. Without this dual uplink, I would be limited to 120MB/s per drive at full utilization, which would be a performance bottleneck.

Aside from the SAS expander, cable management went quite well.

Breaking down the server, I took the opportunity to perform some much-needed cleaning. Although not particularly old, this device has had to live in some fairly awful conditions, including the dustiest room in the dustiest house in the dustiest neighborhood I have ever lived in. Unfortunately, I don’t have filters for the HDD bays, which serve as the primary system intake (the top radiator is the primary exhaust). They also live at ground level. Addressing this enclosure shortcoming is on my to-do list.

As you can see the case fits my components fairly well, and I’ve used the back panel cable management for everything except the SAS cables. This includes fans, pump, front IO, boot disk, and even the motherboard and CPU power supply cables. It’s quite tidy without the SAS cables. Unfortunately there is no way to terminate the SAS cables myself to custom length (the plug ends are actually PCBs), and the cables really don’t like to be bent and do not hold their shape at all, so they get to be spaghetti.

The SAS expander is simply suspended by its Molex 4-pin power connector (don’t crucify me: it doesn’t weigh a lot, this system doesn’t move, and it’s only temporary while I sort out a new case) and held in position by the fairly stiff SAS cables.

The GPU has been mounted in the primary PCIe slot. The IBM M1015, mounted below it, is half-height and so does not obscure the GPU intake fan too badly.

The case will soon be replaced with a Rosewill RSV-R4000 or RSV-L4500, to be rack mounted. This unit is plug and play with my existing hot swap cages, provides plenty of room for my GPU and water cooling loop, is extremely cheap, and even has a front panel intake filter.

Next time, the trials of GPU passthrough.

The Hyperconverged Homelab—Growing RAIDZ vDevs

Quickly approaching 85% utilization of my pool, I found myself in need of more storage capacity. Since the first revision of this project’s hardware was scrounged together on a small budget and utilized some already-owned drives, one of my vDevs ended up being a RAIDZ1 vDev of only 3x2TB. Adding more vDevs to my pool would require either an additional HBA (not possible with my now-undersized motherboard’s single PCIe slot) or a SAS expander. In either case, I would need the drives themselves. I figured that this was a good opportunity to experience growing a ZFS pool by increasing the size of a vDev’s disks.

ZFS does not support “growing” of arrays by adding disks (yet!), unlike some other RAID and RAID-like products. The only way to increase the size of a pool (think of it as pooling the capacity of a bunch of individual RAID arrays) is to add vDevs (the individual RAID arrays in this example), or to replace every single disk in a vDev with a larger capacity. vDevs can be constructed out of mixed-size disks, but are limited to the maximum capacity of the smallest disk. For example, a ZFS vDev containing 2x 2TB and 1x 1TB disks has the same usable capacity as one containing 3x 1TB disks: the “extra” is ignored and unused. Replace the lone undersized disk, however, and ZFS can grow the vDev to the full available size.

Expanding vDevs is a replace-in-place strategy that essentially works the same as rebuilding (“resilvering”) after a disk failure. Recent versions of ZFS support manually replacing a disk without first failing it out of the vDev, which means that on single-parity (RAIDZ1) vDevs this process can be accomplished safely, without losing fault-tolerance. The FreeNAS documentation provides more information and instructions.

Growing by “too much” is not recommended and will result in poor performance, as some metadata will be an non-optimal size for the new disk size. As far as I have read (unfortunately I can’t find a link for this), it’s definitely “too much” around an order of magnitude, although aiming for no more than a factor of five is probably wise. For my case, as an example, we’re growing from 2TB disks to 6TB disks, which is only a factor of 3. This should be perfectly fine.

Speaking of 6TB drives… Hard drives may be cheap in historical terms, but there’s still value in being thrifty. For my use-case, which currently includes read-oriented archival storage, grown mostly write-only and used for backups and media storage, accessed by 1Gb network links, the performance requirements are rather low. The data is (mostly) replaceable, so single redundancy is adequate. This means that I can safely use the cheapest hard drives possible, which are currently found in Seagate Backup Plus Hub 8TB carried by Costco for only $129. (At the time I purchased, the last of their stock of the 6TB variant was being cleared for even cheaper.)

These drives are Seagate Baracuda ST8000DM005, which are an SMR drive. This technology, which has been used to great effect to increase the size of cheap consumer drives, essentially by overlapping the data on the platters, is only really suitable for write-once use and is known to be rather failure-prone. However, these have plenty of cache and perform just fine for reading, and adequately for writing, so are perfectly acceptable for my use-case.

Growing the target vDev was fairly straightforward. I had extra drive bays unused so simply shucked the drives from their plastic enclosures and proceeded one at a time. After formatting each disk for FreeNAS, I initiated the resilvering process. This took somewhere between 36–48 hours to resilver 1.7TB of data per drive. I found this performance rather poor, but was not able to locate an obvious bottleneck at the time. In hindsight, inadequate RAM was likely the cause. After resilvering I removed the old drive to make room for the next replacement. Although my drive bays are hot-swap (and this is supported by both my HBA and FreeNAS), I didn’t label the drive bays when I installed them initially and had some difficulty identifying the unused drives. The best solution I found was to leverage the per-disk activity light of the Rosewill hotswap cages.

A lovely sight.

With capacity to spare, I can finally test out some new backup strategies to support, such as Time Machine over SMB.

The Hyperocnverged Homelab—Configuration c.2018

Although my original use-case included virtualizing a router/firewall, it was only beneficial for a couple months while I was still living in accommodation with a shared network. I ran OpenWRT for simplicity of configuration and had two separate vSwitches configured in ESXi, one for each NIC. This allowed me to connect to the shared network while retaining control over my own subnet and not leaking device access or mDNS. I had hoped to pass through the motherboard’s 802.11ac WiFi NIC (which worked fine), but was stymied by OpenWRT’s glacial upgrade cycle. They were running an absolutely ancient version of the Linux kernel which predated support for my WiFi chipset. I considered working around this by creating a virtual Access Point using a VM of Ubuntu Server or other lightweight Linux which would support the WiFi chipset, but it just wasn’t worth the trouble.

After spending a couple months abroad with the server powered down I returned home and found a new apartment. I was able to get CenturyLink’s symmetric Gigabit offering installed, and running their provided router eliminated the need for a virtual router appliance. The OpenWRT VM was quickly mothballed and replaced with an Ubuntu Server 18.04 VM to run Ubiquiti’s UniFi Controller.

The current (Dec. 2018) software configuration is fairly simple:

  • ESXi Server 6.5
    • FreeNAS 9.10
      • 12GB RAM, 4vCPU, 8GB boot disk
      • IBM M1015 IT Mode via PCIe passthrough
      • 2x RAIDZ1 vDevs of 3 disks (consumer 2 and 5TB drives)
      • Jails for utilities benefiting from direct pool access
    • Ubuntu Server 18.04
      • 2GB RAM, 2vCPU, 8GB boot disk
      • Ubiquiti UniFi Controller
      • DIY Linode dynamic dns

The Hyperconverged HomeLab—Introduction

Now in its second relatively trouble-free year, it’s finally time to get some upgrades on my hyperconverged homelab. First, however, a long-overdue introduction!

The current case configuration: a modified Cooler Master Centurion 590 mid-tower case.

This project started out as a compact, low-power, ultra-quiet NAS build. However, I quickly decided that I wanted to virtualize and give myself more power and flexibility. At the very least, being able to run pfSense or another router/firewall appliance on the same device represented a significant benefit in terms of portability: the ability to plug into basically any network without making the NAS available on it was a huge potential benefit.

I decided to use a 35W Intel desktop processor and consumer motherboard. They’re economical and readily available, with plenty of products available for performance and cooling enhancement. At the time, Skylake (6th Gen.) was mature and Kaby Lake didn’t have an official release date, so I chose the i5-6500T. The $100 premium on MSRP and near total lack of single unit availability prevented me from choosing an i7-6700T.

For motherboard I chose Gigabyte’s GA-H87N-WIFI (rev. 2.0), a mini-ITX motherboard from their well-regarded UltraDurable line. The primary driver of this decision was the onboard dual 1GBase-T and M.2 802.11a/b/g/n plus Bluetooth 4.0 via M.2 card. Dual LAN was critical for the device’s potential use as a router, as virtualizing my NAS would require utilizing the single available PCIe slot for an HBA or RAID card.

RAM was sourced as 2x16GB G.Skill Aegis modules (still the cheapest DDR4-2133 2x16GB kit on the market), providing a solid starting point while leaving two DIMMs free for later expansion to the motherboard and processor’s max supported 64GB. I sourced a Seasonic SS460FL2 a 460W fanless modular PSU, a cheap SanDisk 240GB SSD for a boot drive, and Corsair’s H115i all-in-one liquid cooling loop.

At this time I was still case-less, and waffling on the purchase of a U-NAS NSC-800 hot-swap enclosure, when I discovered Rosewill’s 4-in-3 hot swap cages. I quickly located the Cooler Master Centurion 590 on local Craigslist, which represented a decent compromise on size and offered 9 5.25″ drive bays.

The final piece of the puzzle was the HBA, an IBM M1015 RAID card which I cross-flashed to LSI generic IT Mode firmware. See this other post for details. With that, the build was hardware-complete and went together (fairly) smoothly. Only minor case modification was required to fit the ridiculously over-sized water cooling radiator, which had to be mounted on the top of the case with the fans inside, since the case was not designed for water cooling and here was inadequate clearance above the motherboard.

I installed ESXi on the boot disk and then installed FreeNAS into a VM. (Yes, I should have drive redundancy for my VM datastore.) After flashing the M1015 everything was relatively plug-and-play, set-and-forget, with the only notable downside being that the motherboard refused to POST without detecting an attached display. That issue was solved when I discovered that an HDMI VGA adapter I purchased acted as a display simulator. This system served me well for the last couple years, but recently I’ve wanted to expand my capabilities. Having a single PCIe slot is somewhat limiting, especially since I didn’t end up buying a mini-ITX sized case…